Docker | AWS EC2を使用したDockerの基本的な利用方法

AWSとは,Amazon Web Servicesの略であり,アマゾンが提供するクラウドサービスである.AWSを利用してWebサーバーを構築する代表的な方法は,以下2通りある.
・Amazon Simple Storage Service (Amazon S3)
・Amazon Elastic Compute Cloud (Amazon EC2)
Amazon S3ではアプリケーションサーバを動かすことができないので,PHPなどのサーバーサイドプログラムなどを動かすことはできず,静的ファイルしか扱えない.Amazon EC2ではApacheなどのアプリケーションサーバをインストール可能なので,Pythonなどのバックエンド言語を利用することができる.S3では静的Webサイトをホスティングし,EC2ではWordPressなどの動的Webサイトを構築する.
Dockerとは,動作が非常に軽量であり,コンテナを使用してアプリケーションを構築,テスト,デプロイできるソフトウェアプラットフォームである.
今回は,AWS EC2を利用したDockerの一通りの利用方法をこの記事にて記す.
AWS EC2を使用したDockerの利用方法
AWS EC2でインスタンス作成
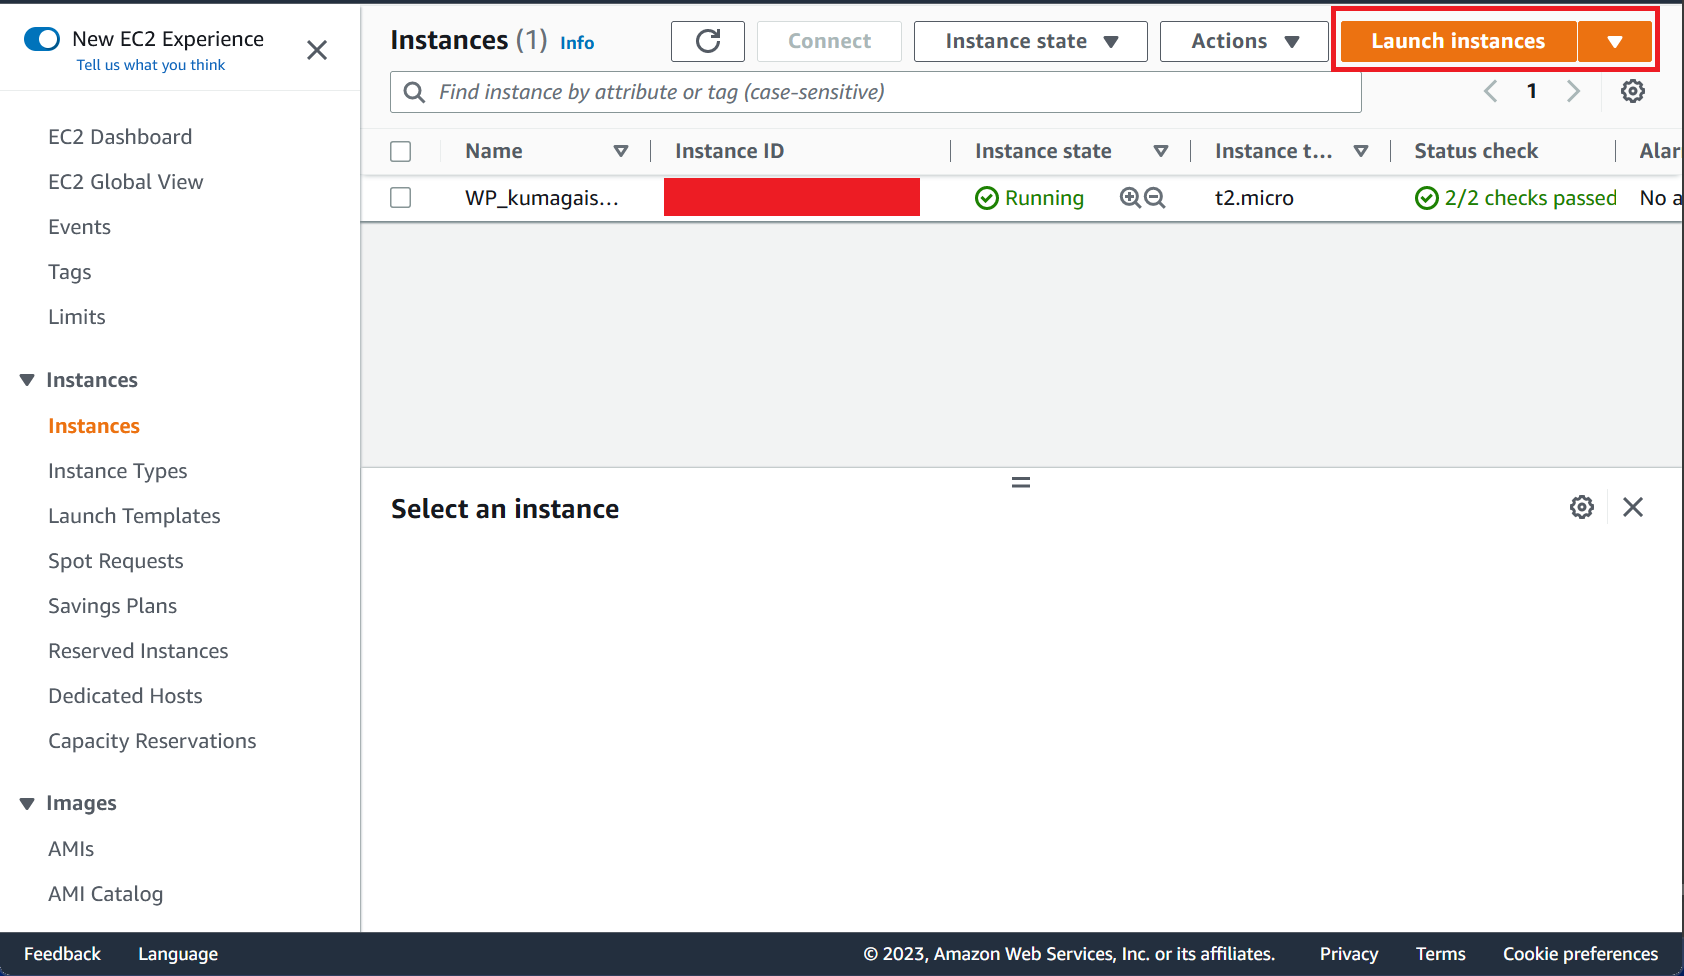
AWSにログインすると,以下画面になるので,"Launch instances"をクリックする.なお,AWSのアカウントおよびIAMユーザーの作成方法はこちらの記事で説明した.
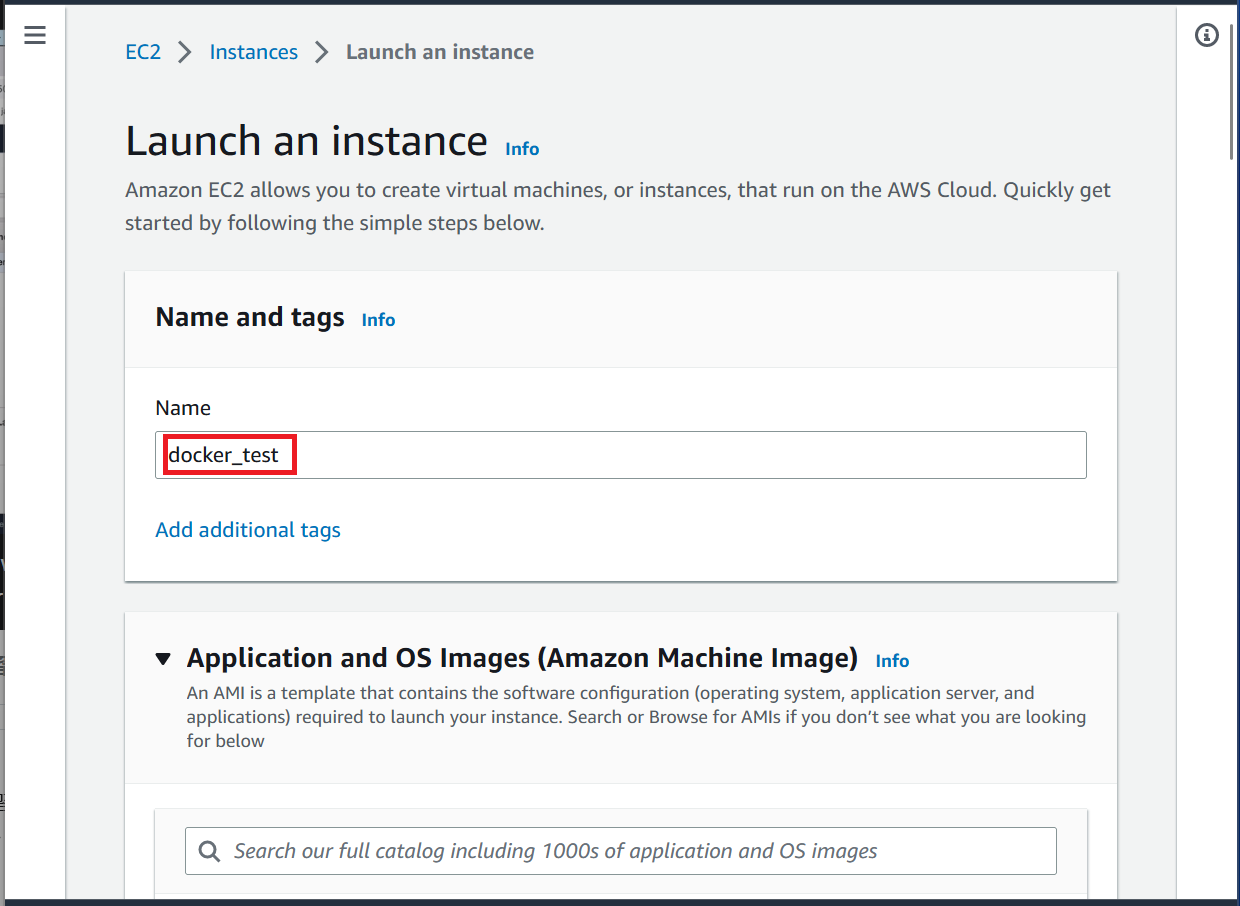
以下画面に遷移するので,今回作成するインスタンスの名前を入力し,スクロールダウンする.
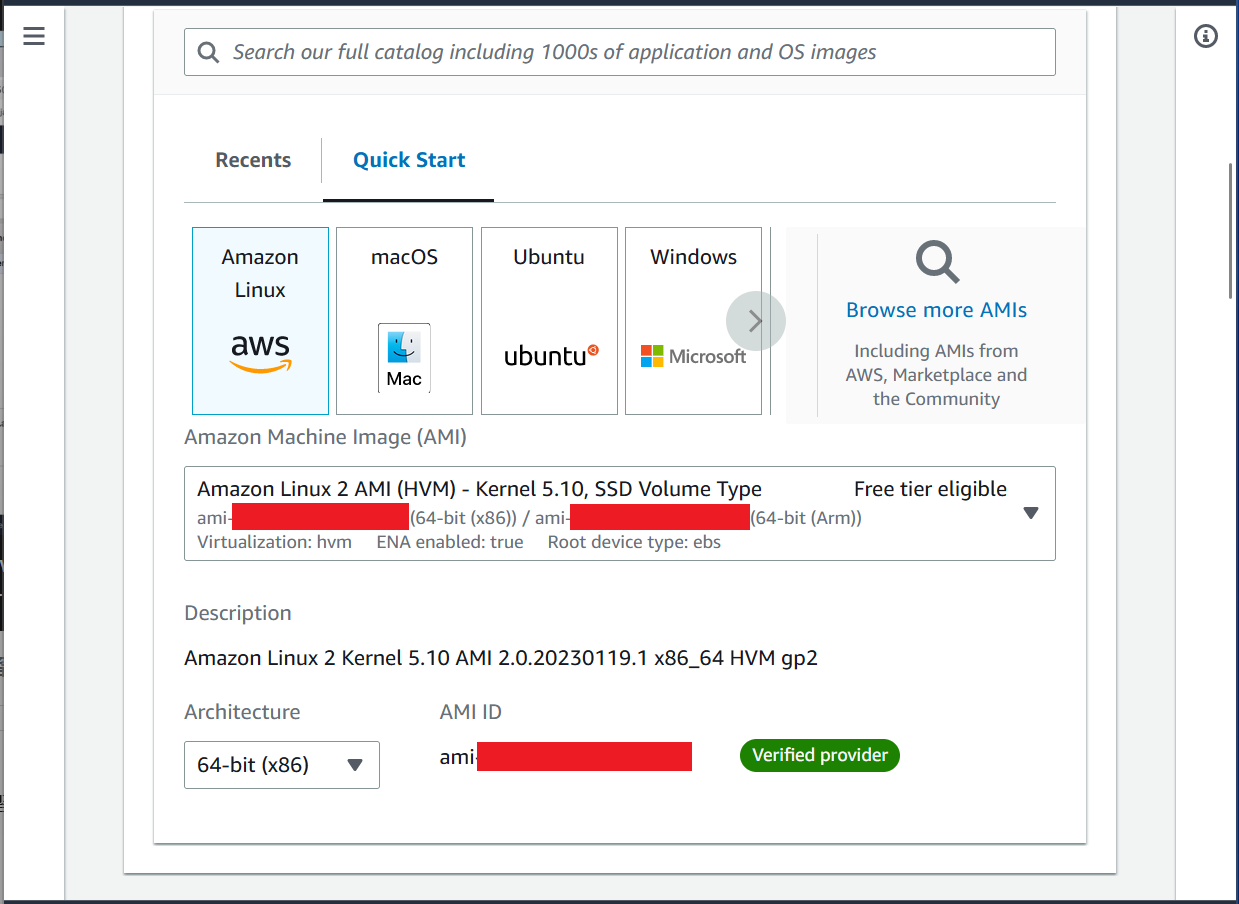
以下画面に遷移する.今回,Amazon Linuxを選択した.スクロールダウンする.
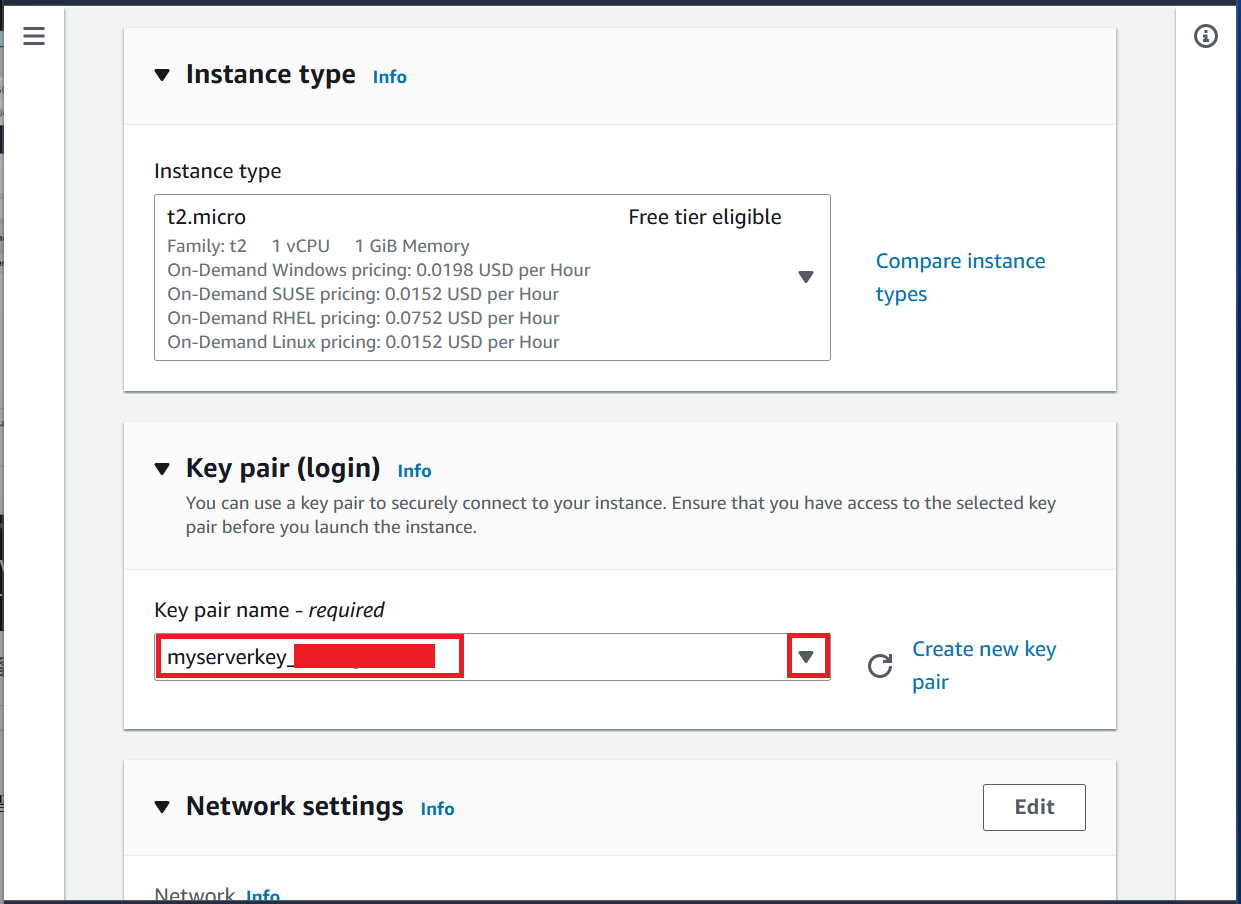
以下画面に遷移する.私の場合,すでに取得しているキーペアを利用した.その後,スクロールダウンする.なお,キーペアの作成方法は,こちらの記事の1(1)を参照すること.
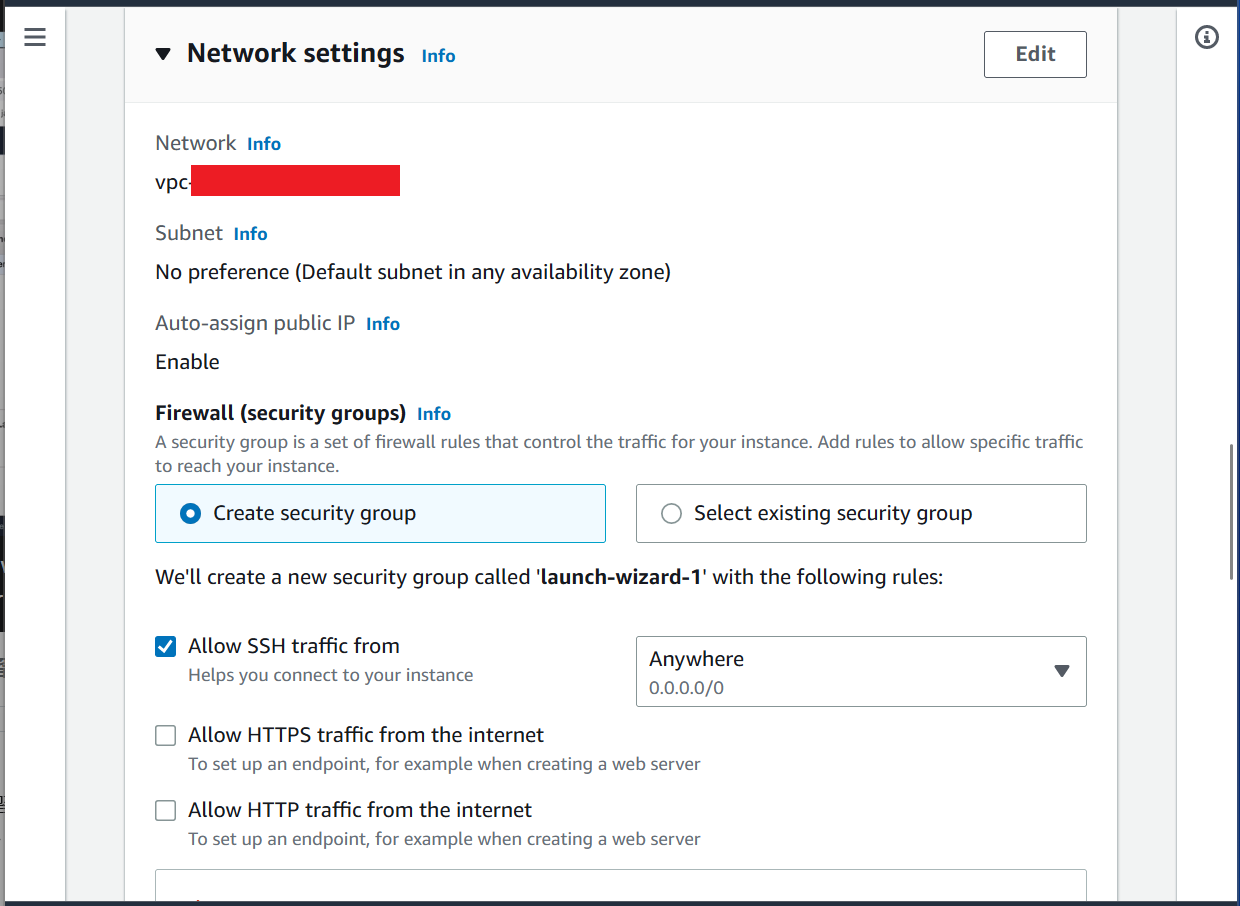
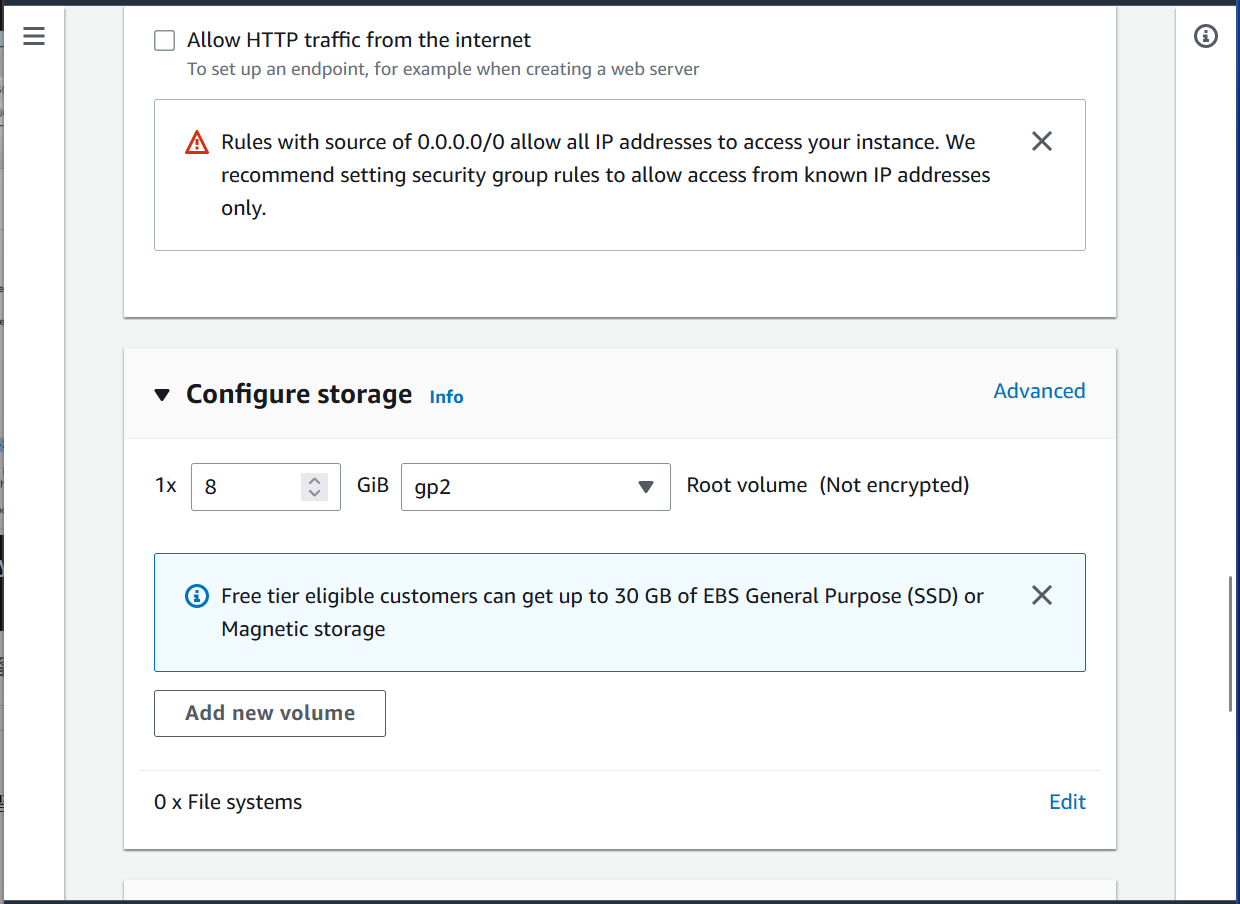
以下画面になるので,希望する項目にチェックを入れ,スクロールダウンする.なお,私の場合,デフォルトのままで変更はしていない.
以下画面になるので,スクロールダウンする.
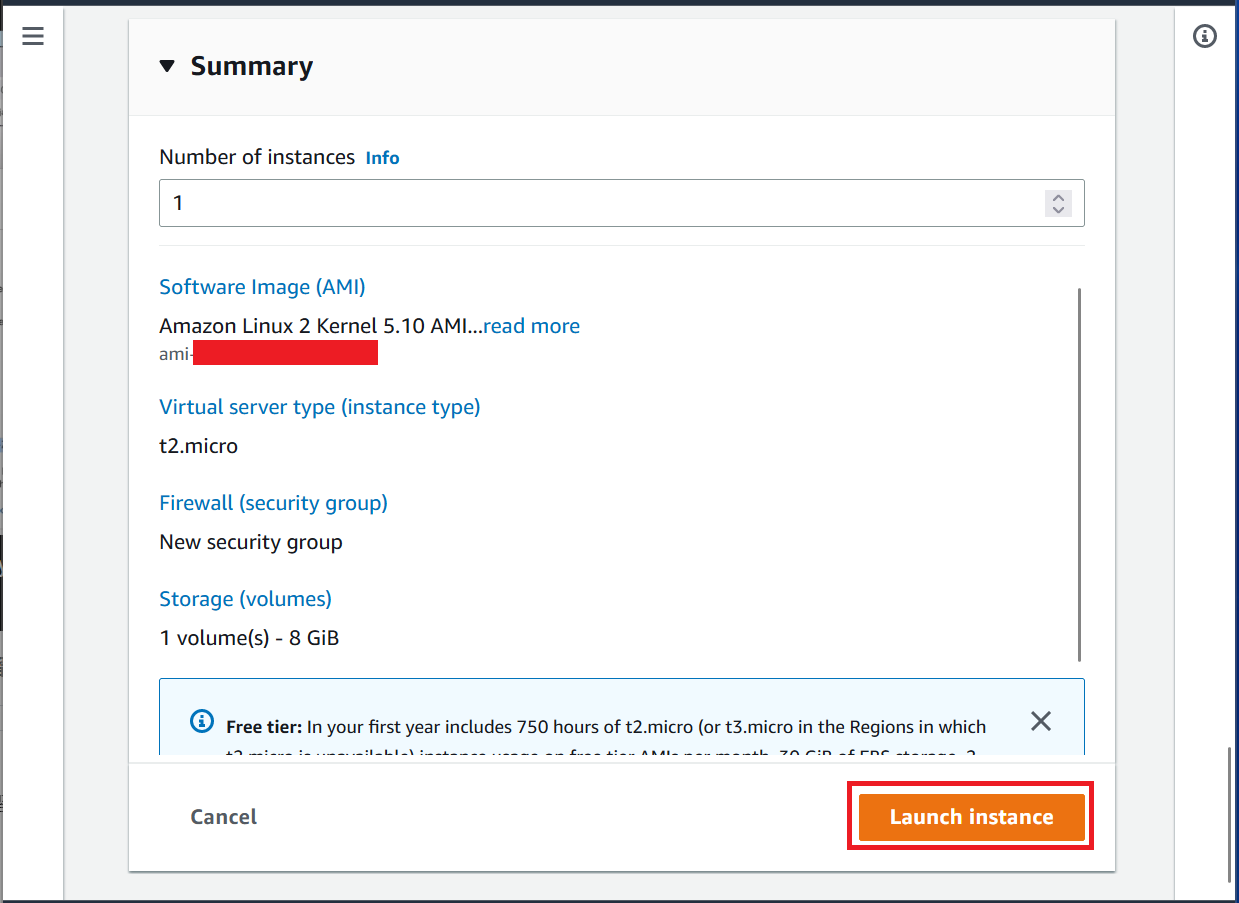
最下部である以下画面になるので,"Launch instance"をクリックする.
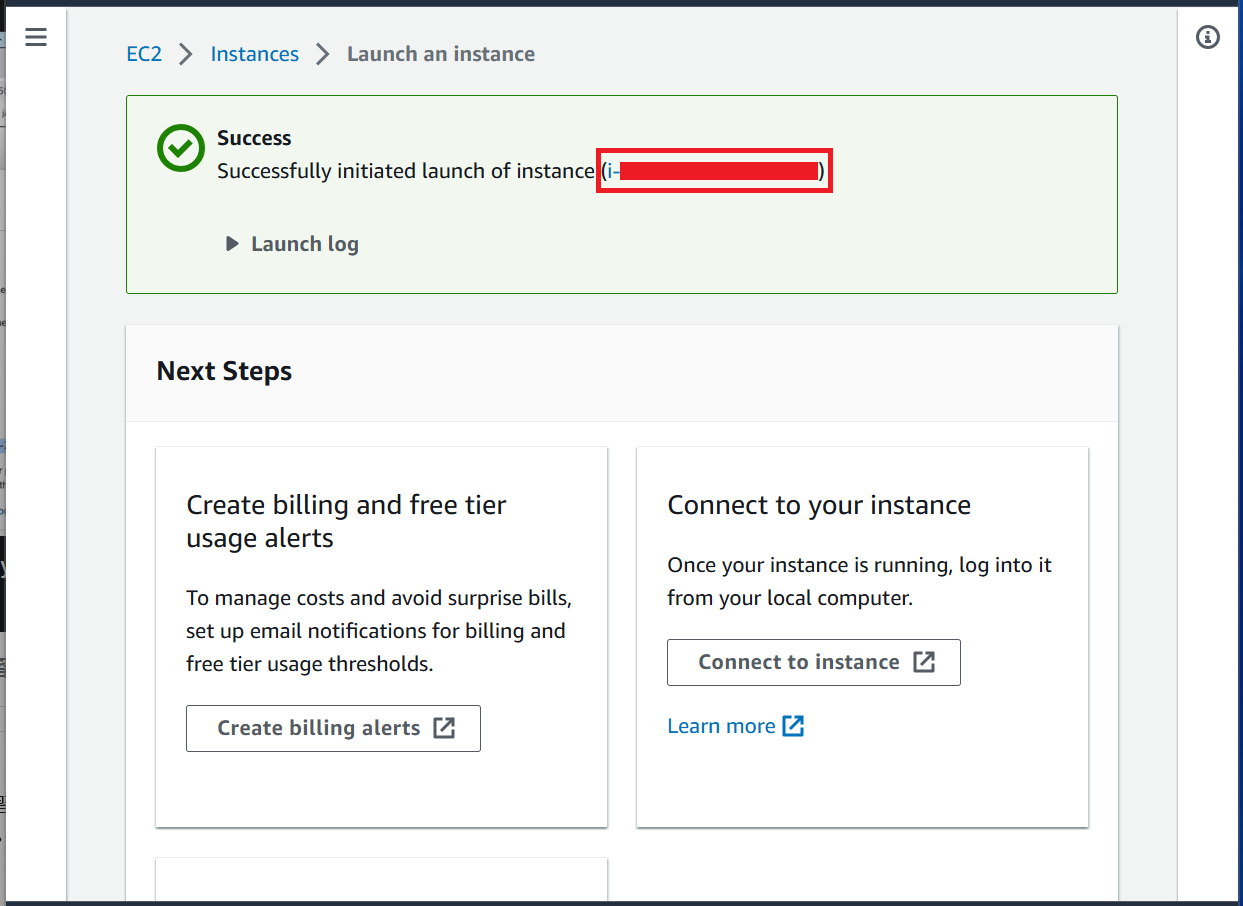
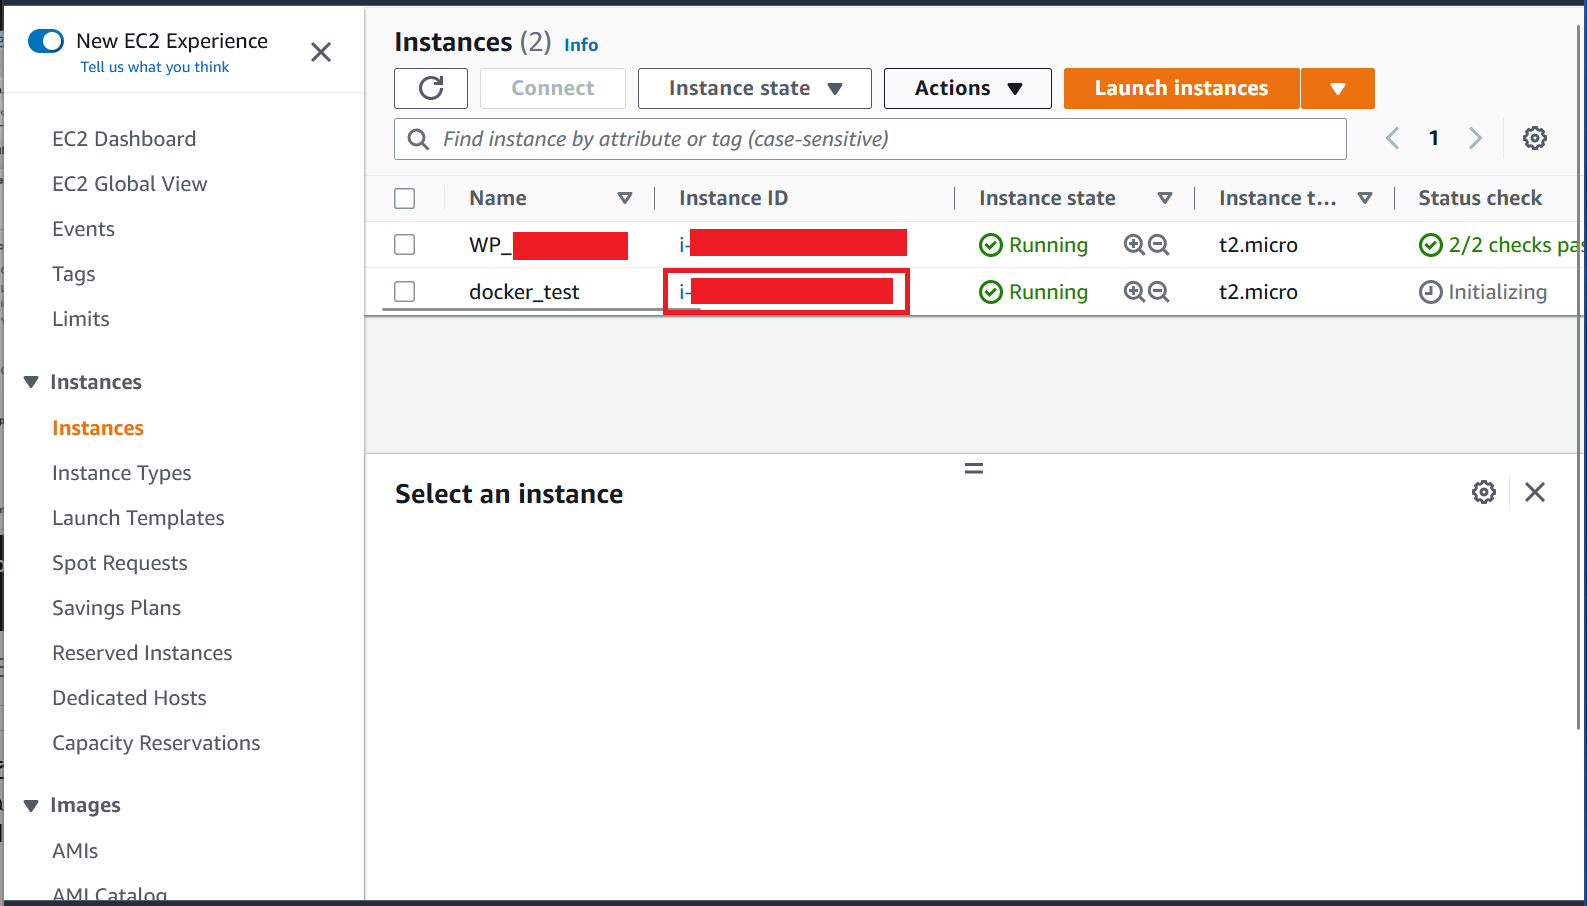
以下画面に遷移する.赤枠の"Instance ID"をクリックする.
以下画面に遷移する.今回作成したインスタンス(docker_test)が表示されている.赤枠の"Instance ID"をクリックする.
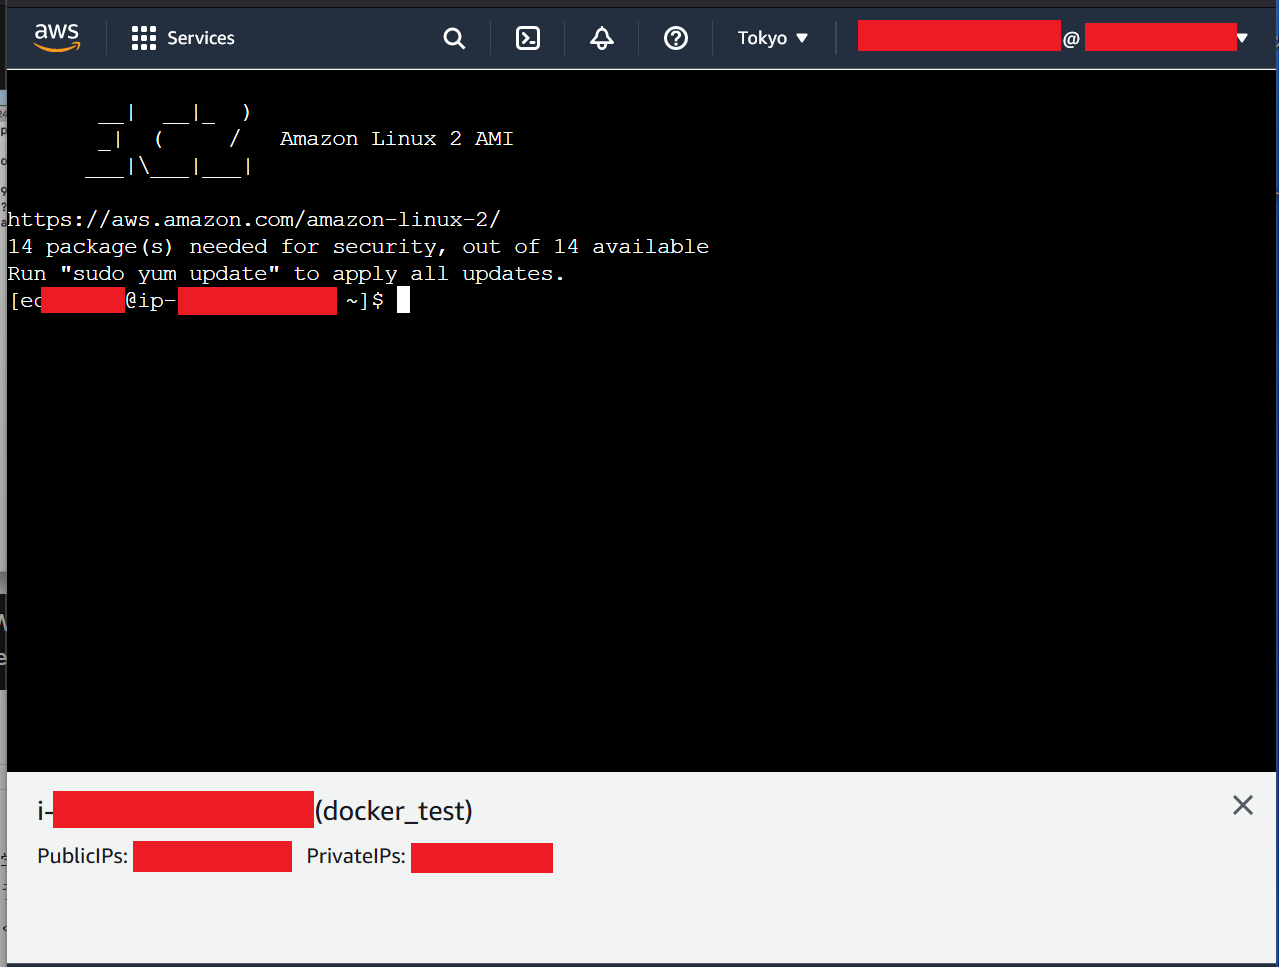
以下画面に遷移する."Action"をクリックし,"Connect"を選択する.

以下画面に遷移するので,"Connect"をクリックする.

新しいタブでターミナルが開かれるので,ここでコマンド操作をする.
Dockerの基本コマンド
Docker Run
以下コマンドを実行し,Rootに変更する.
$ sudo -i以下コマンドを実行し,Dockerをインストールする.途中で問題ないか質問されるので,"y"ボタンをクリックすると,インストールが完了する.
# yum install dockerDockerのインストールが完了したので,以下コマンドを実行すると,Dockerのバージョンが表示される.
# docker --version
Docker version 20.10.17, build 100c701
以下コマンドを実行すると,現在のdockerの情報が表示される.現状docker daemonに接続することができないことがわかる.
# docker info
Client:
 Context:    default
 Debug Mode: false

Server:
ERROR: Cannot connect to the Docker daemon at unix:///var/run/docker.sock. Is the docker daemon running?
errors pretty printing info
以下コマンドを実行し,dockerのサービスを始める.
# service docker start
Redirecting to /bin/systemctl start docker.service
再度以下コマンドを実行すると,以下のように表示される.なお,表示させたくない箇所には,手動で"xxx"に変更している(以降でも同様に対応済み).
まだ作成していないので,Containerの数は0になっており,Docker Swarm(Docker社が提供しているオーケストレーションツール)は現状inactiveになっている.
# docker info
Client:
 Context:    default
 Debug Mode: false

Server:
 Containers: 0
  Running: 0
  Paused: 0
  Stopped: 0
 Images: 0
 Server Version: 20.10.17
 Storage Driver: overlay2
  Backing Filesystem: xfs
  Supports d_type: true
  Native Overlay Diff: true
  userxattr: false
 Logging Driver: json-file
 Cgroup Driver: cgroupfs
 Cgroup Version: 1
 Plugins:
  Volume: local
  Network: bridge host ipvlan macvlan null overlay
  Log: awslogs fluentd gcplogs gelf journald json-file local logentries splunk syslog
 Swarm: inactive
 Runtimes: io.containerd.runc.v2 io.containerd.runtime.v1.linux runc
 Default Runtime: runc
 Init Binary: docker-init
 containerd version: xxx
 runc version: xxx
 init version: xxx
 Security Options:
  seccomp
   Profile: default
 Kernel Version: 5.10.162-141.675.amzn2.x86_64
 Operating System: Amazon Linux 2
 OSType: linux
 Architecture: x86_64
 CPUs: 1
 Total Memory: 964.8MiB
 Name: ip-xxx
 ID: xxx
 Docker Root Dir: /var/lib/docker
 Debug Mode: false
 Registry: https://index.docker.io/v1/
 Labels:
 Experimental: false
 Insecure Registries:
  xxx
 Live Restore Enabled: false
以下コマンドを実行し,hello-worldイメージをpullする.
# docker run hello-world

Unable to find image 'hello-world:latest' locally
latest: Pulling from library/hello-world
xxx: Pull complete
Digest: sha256:xxx
Status: Downloaded newer image for hello-world:latest

Hello from Docker!
This message shows that your installation appears to be working correctly.

To generate this message, Docker took the following steps:
 1. The Docker client contacted the Docker daemon.
 2. The Docker daemon pulled the "hello-world" image from the Docker Hub.
    (amd64)
 3. The Docker daemon created a new container from that image which runs the
    executable that produces the output you are currently reading.
 4. The Docker daemon streamed that output to the Docker client, which sent it
    to your terminal.

To try something more ambitious, you can run an Ubuntu container with:
 $ docker run -it ubuntu bash

Share images, automate workflows, and more with a free Docker ID:
 https://hub.docker.com/

For more examples and ideas, visit:
 https://docs.docker.com/get-started/
以下コマンドを実行し,dockerのイメージ一覧を表示させる.以下のようにイメージの一覧が表示される.
# docker images
REPOSITORY    TAG       IMAGE ID       CREATED         SIZE
hello-world   latest    xxxxxxxxxxxx   16 months ago   13.3kB
“docker run hello-world"を実行後に出力した内容に記載のある"docker run -it ubuntu bash"(“docker run -i -t ubuntu bash"の省略形)を実行する.
ubuntuのコンテナを起動させることができる.
# docker run -it ubuntu bash

Unable to find image 'ubuntu:latest' locally
latest: Pulling from library/ubuntu
677076032cca: Pull complete
Digest: sha256:xxx
Status: Downloaded newer image for ubuntu:latest
ubuntuのディレクトリに移動するので,以下(“pwd"=>"ls")を実行すると,docker container内のubuntuの各ディレクトリを表示させることができた.抜け出す場合には,"exit"を実行する.
# pwd
/

# ls
bin   dev  home  lib32  libx32  mnt  proc  run   srv  tmp  var
boot  etc  lib   lib64  media   opt  root  sbin  sys  usr

# exit
以下を実行すると,ubuntuイメージが表示される.
# docker images
REPOSITORY    TAG       IMAGE ID       CREATED         SIZE
ubuntu        latest    xxxxxxxxxxxx   13 days ago     77.8MB
hello-world   latest    xxxxxxxxxxxx   16 months ago   13.3kB
以下を実行すると,version 10.3のmariadbイメージがpullされる.
# docker pull mariadb:10.3以下を実行すると,dockerで実行したコマンドを確認できる.
# history
    1  yum install docker
    2  docker --version
    3  docker info
    4  start docker.service
    5  service docker start
    6  docker info
    7  exit
    8  docker images
    9  docker run my-docker-test
   10  docker images
   11  docker run hello-world
   12  docker images
   13  docker run -it ubuntu bash
   14  docker images
   15  docker pull mariadb:10.3
   16  docker images
   17  history
以下を実行すると,docker runのオプションがすべて表示される.
# docker run --help

Usage:  docker run [OPTIONS] IMAGE [COMMAND] [ARG...]

Run a command in a new container

Options:
      --add-host list                  Add a custom host-to-IP mapping (host:ip)
  -a, --attach list                    Attach to STDIN, STDOUT or STDERR
      --blkio-weight uint16            Block IO (relative weight), between 10 and 1000, or 0 to
                                       disable (default 0)
      --blkio-weight-device list       Block IO weight (relative device weight) (default [])
      --cap-add list                   Add Linux capabilities
      --cap-drop list                  Drop Linux capabilities
      --cgroup-parent string           Optional parent cgroup for the container
      --cgroupns string                Cgroup namespace to use (host|private)
                                       'host':    Run the container in the Docker host's cgroup
                                       namespace
                                       'private': Run the container in its own private cgroup
                                       namespace
                                       '':        Use the cgroup namespace as configured by the
                                                  default-cgroupns-mode option on the daemon (default)
      --cidfile string                 Write the container ID to the file
      --cpu-period int                 Limit CPU CFS (Completely Fair Scheduler) period
      --cpu-quota int                  Limit CPU CFS (Completely Fair Scheduler) quota
      --cpu-rt-period int              Limit CPU real-time period in microseconds
      --cpu-rt-runtime int             Limit CPU real-time runtime in microseconds
  -c, --cpu-shares int                 CPU shares (relative weight)
      --cpus decimal                   Number of CPUs
      --cpuset-cpus string             CPUs in which to allow execution (0-3, 0,1)
      --cpuset-mems string             MEMs in which to allow execution (0-3, 0,1)
  -d, --detach                         Run container in background and print container ID
      --detach-keys string             Override the key sequence for detaching a container
      --device list                    Add a host device to the container
      --device-cgroup-rule list        Add a rule to the cgroup allowed devices list
      --device-read-bps list           Limit read rate (bytes per second) from a device (default [])
      --device-read-iops list          Limit read rate (IO per second) from a device (default [])
      --device-write-bps list          Limit write rate (bytes per second) to a device (default [])
      --device-write-iops list         Limit write rate (IO per second) to a device (default [])
      --disable-content-trust          Skip image verification (default true)
      --dns list                       Set custom DNS servers
      --dns-option list                Set DNS options
      --dns-search list                Set custom DNS search domains
      --domainname string              Container NIS domain name
      --entrypoint string              Overwrite the default ENTRYPOINT of the image
  -e, --env list                       Set environment variables
      --env-file list                  Read in a file of environment variables
      --expose list                    Expose a port or a range of ports
      --gpus gpu-request               GPU devices to add to the container ('all' to pass all GPUs)
      --group-add list                 Add additional groups to join
      --health-cmd string              Command to run to check health
      --health-interval duration       Time between running the check (ms|s|m|h) (default 0s)
      --health-retries int             Consecutive failures needed to report unhealthy
      --health-start-period duration   Start period for the container to initialize before starting
                                       health-retries countdown (ms|s|m|h) (default 0s)
      --health-timeout duration        Maximum time to allow one check to run (ms|s|m|h) (default 0s)
      --help                           Print usage
  -h, --hostname string                Container host name
      --init                           Run an init inside the container that forwards signals and
                                       reaps processes
  -i, --interactive                    Keep STDIN open even if not attached
      --ip string                      IPv4 address (e.g., 172.30.100.104)
      --ip6 string                     IPv6 address (e.g., 2001:db8::33)
      --ipc string                     IPC mode to use
      --isolation string               Container isolation technology
      --kernel-memory bytes            Kernel memory limit
  -l, --label list                     Set meta data on a container
      --label-file list                Read in a line delimited file of labels
      --link list                      Add link to another container
      --link-local-ip list             Container IPv4/IPv6 link-local addresses
      --log-driver string              Logging driver for the container
      --log-opt list                   Log driver options
      --mac-address string             Container MAC address (e.g., 92:d0:c6:0a:29:33)
  -m, --memory bytes                   Memory limit
      --memory-reservation bytes       Memory soft limit
      --memory-swap bytes              Swap limit equal to memory plus swap: '-1' to enable
                                       unlimited swap
      --memory-swappiness int          Tune container memory swappiness (0 to 100) (default -1)
      --mount mount                    Attach a filesystem mount to the container
      --name string                    Assign a name to the container
      --network network                Connect a container to a network
      --network-alias list             Add network-scoped alias for the container
      --no-healthcheck                 Disable any container-specified HEALTHCHECK
      --oom-kill-disable               Disable OOM Killer
      --oom-score-adj int              Tune host's OOM preferences (-1000 to 1000)
      --pid string                     PID namespace to use
      --pids-limit int                 Tune container pids limit (set -1 for unlimited)
      --platform string                Set platform if server is multi-platform capable
      --privileged                     Give extended privileges to this container
  -p, --publish list                   Publish a container's port(s) to the host
  -P, --publish-all                    Publish all exposed ports to random ports
      --pull string                    Pull image before running ("always"|"missing"|"never")
                                       (default "missing")
      --read-only                      Mount the container's root filesystem as read only
      --restart string                 Restart policy to apply when a container exits (default "no")
      --rm                             Automatically remove the container when it exits
      --runtime string                 Runtime to use for this container
      --security-opt list              Security Options
      --shm-size bytes                 Size of /dev/shm
      --sig-proxy                      Proxy received signals to the process (default true)
      --stop-signal string             Signal to stop a container (default "SIGTERM")
      --stop-timeout int               Timeout (in seconds) to stop a container
      --storage-opt list               Storage driver options for the container
      --sysctl map                     Sysctl options (default map[])
      --tmpfs list                     Mount a tmpfs directory
  -t, --tty                            Allocate a pseudo-TTY
      --ulimit ulimit                  Ulimit options (default [])
  -u, --user string                    Username or UID (format: <name|uid>[:<group|gid>])
      --userns string                  User namespace to use
      --uts string                     UTS namespace to use
  -v, --volume list                    Bind mount a volume
      --volume-driver string           Optional volume driver for the container
      --volumes-from list              Mount volumes from the specified container(s)
  -w, --workdir string                 Working directory inside the container
以下コマンドを実行すると,nginxのイメージが起動する.nginxの名前を自分で名前を付けたい場合は,"docker run -i -d -t –name=mycontainer -p 80:80 nginx"を実行する.
- -i: Keep STDIN open even if not attached (接続されていなくとも標準入力を開いたままにする)
- -d: Run container in background and print container ID (バックグラウンドでコンテナーを動かし,コンテナIDを表示する)
- -t: Allocate a pseudo-TTY (疑似端末を割り当てる; pseudo=疑似, tty=text-termial=標準入出力となっている端末デバイス)
- -p: Publish a container’s port(s) to the host (ホストにコンテナポートを発行する)
- 80(ホストのポート):80(コンテナのポート); ホスト80番ポートへの通信はすべてコンテナのポートへ転送している
# docker run -i -d -t -p 80:80 nginx以下を実行し,イメージ一覧を出力する.
# docker images
REPOSITORY    TAG       IMAGE ID       CREATED         SIZE
mariadb       10.3      xxxxxxxxxxxx   36 hours ago    369MB
nginx         latest    xxxxxxxxxxxx   4 days ago      142MB
ubuntu        latest    xxxxxxxxxxxx   13 days ago     77.8MB
hello-world   latest    xxxxxxxxxxxx   16 months ago   13.3kB
以下を実行すると,process statusが出力される.
# docker ps
CONTAINER ID   IMAGE     COMMAND                  CREATED         STATUS         PORTS                               NAMES
xxxxxxxxxxxx   nginx     "/docker-entrypoint.…"   2 minutes ago   Up 2 minutes   0.0.0.0:80->80/tcp, :::80->80/tcp   busy_wright
AWSにログインし,"docker_test"の"Instance ID"をクリックする.
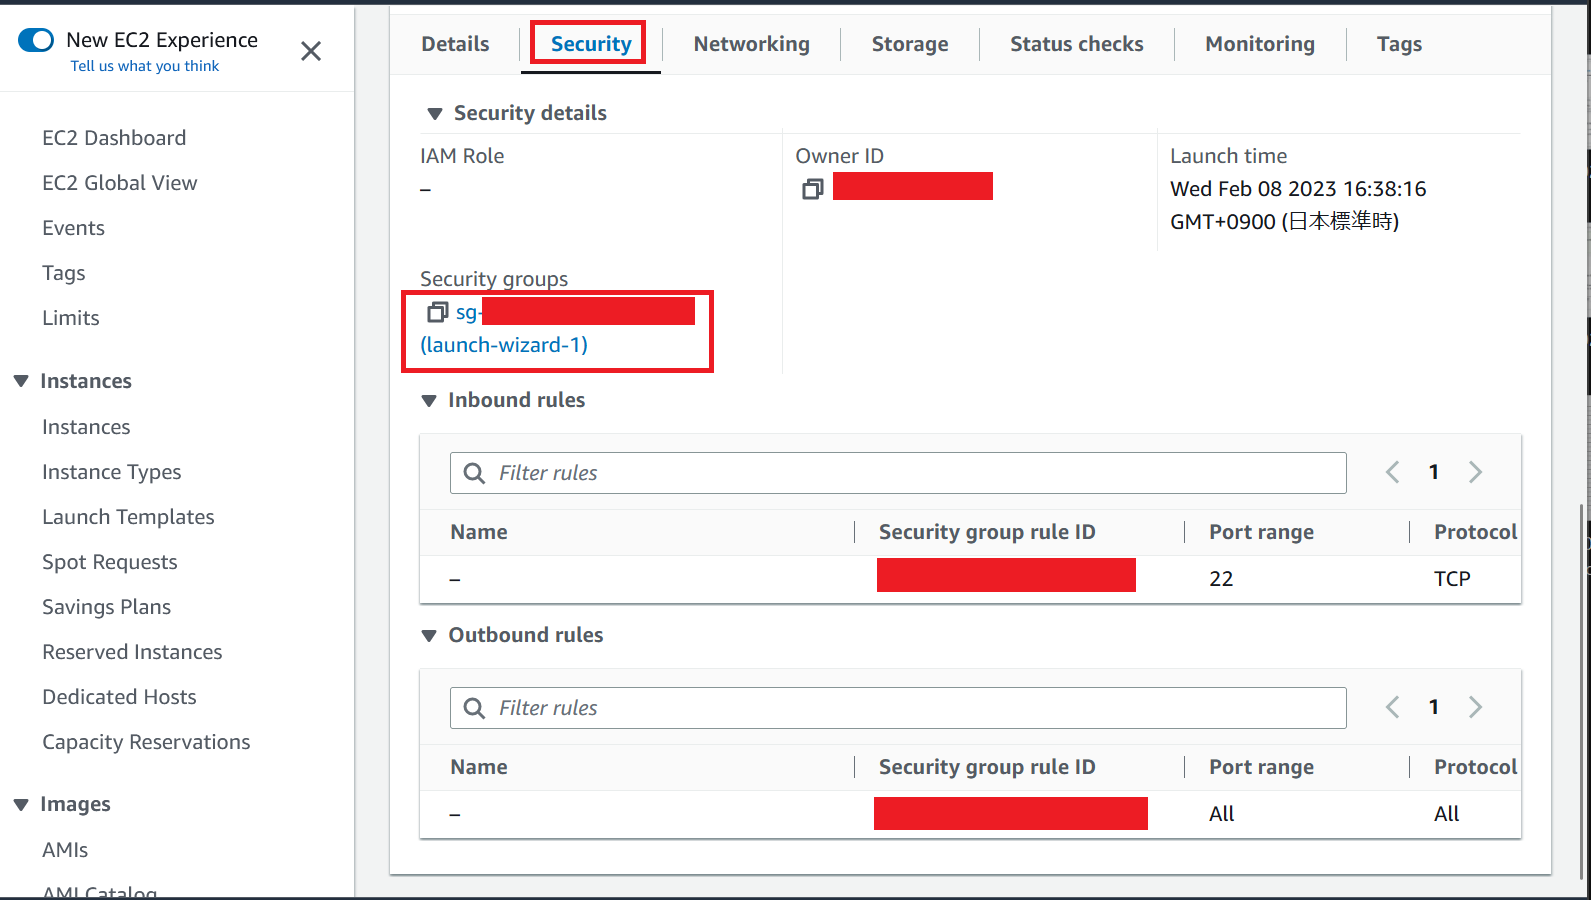
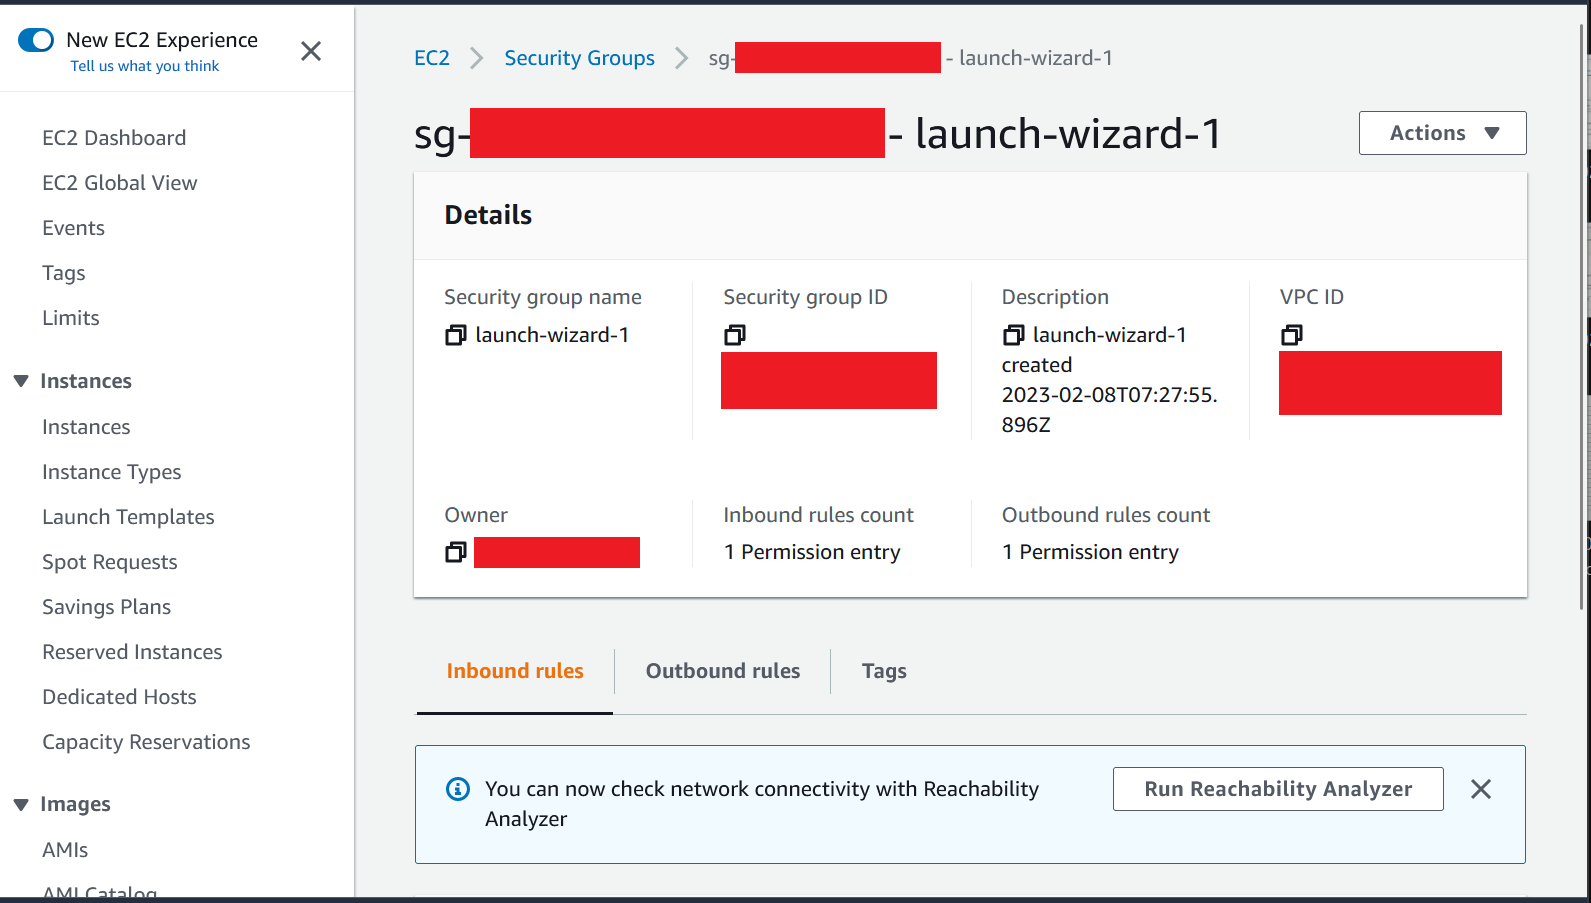
Instance IDの画面に遷移し,スクロールダウンすると以下画面になるので,Security groupsをクリックする.
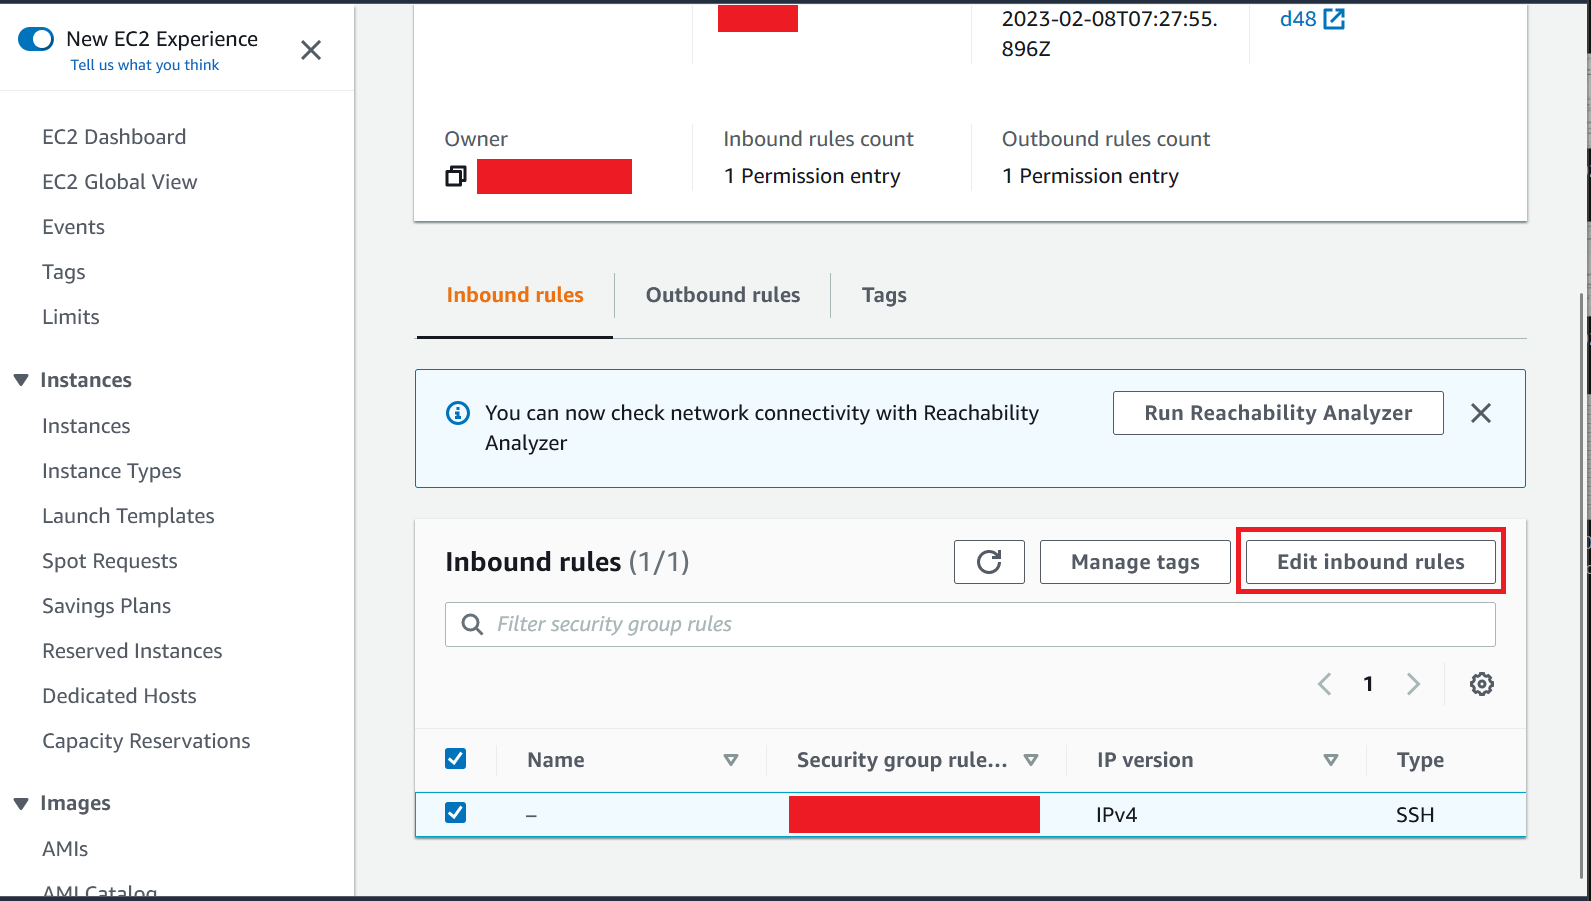
以下画面に遷移するので,スクロールダウンする.
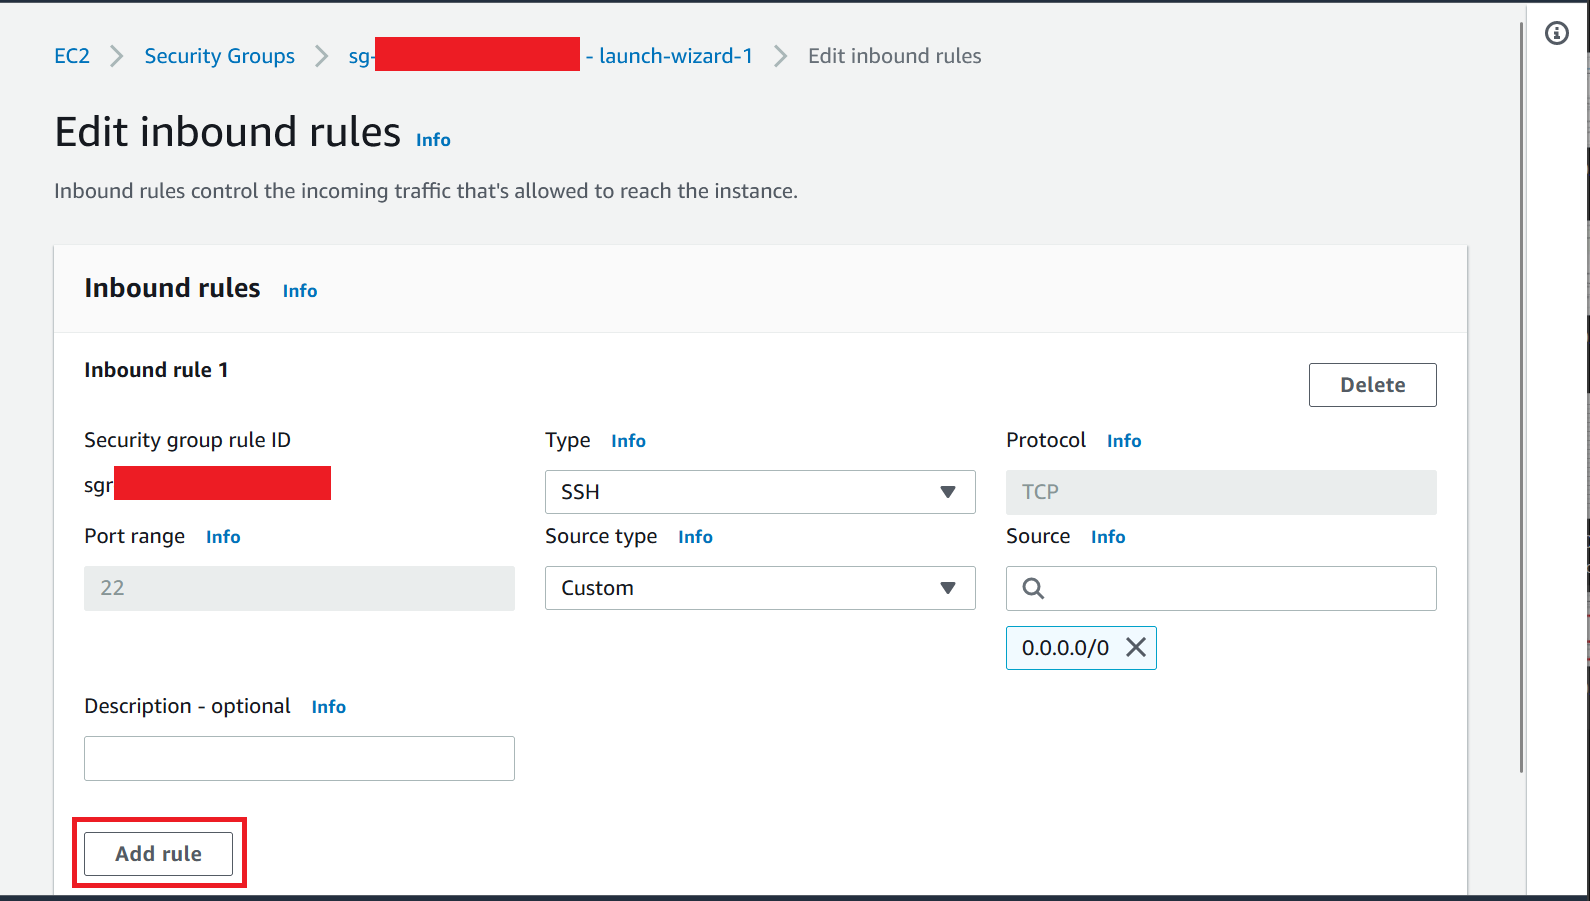
以下画面になるので,"Edit inbound rules"をクリックする.
以下画面に遷移するので,"Add rule"をクリックする.
上記でコンテナのポート番号を80にしたので,Port rangeを80と入力,Source typeを以下に選択し,"Save rules"をクリックする.
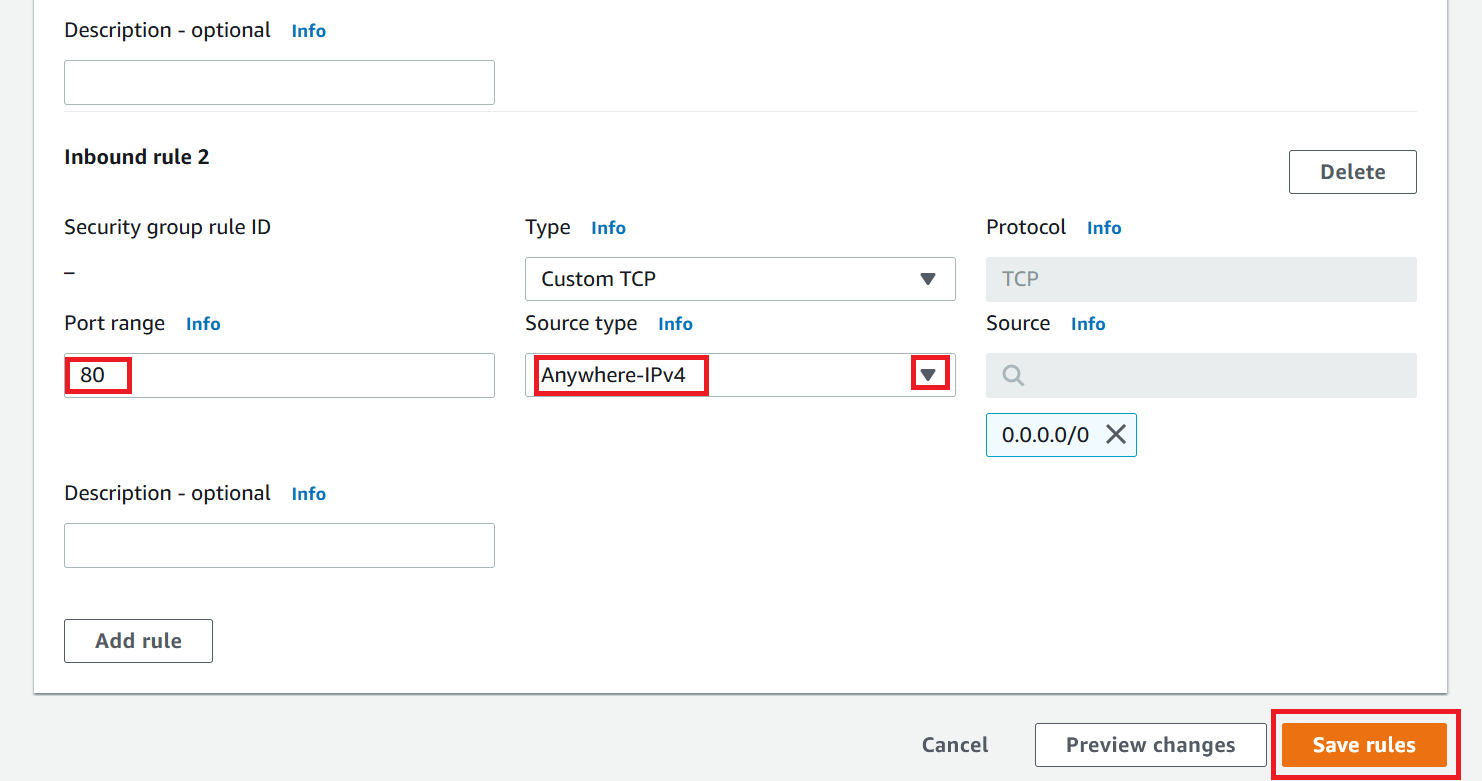
以下画面が出力したら,Inbound security group rulesの変更が成功となる.

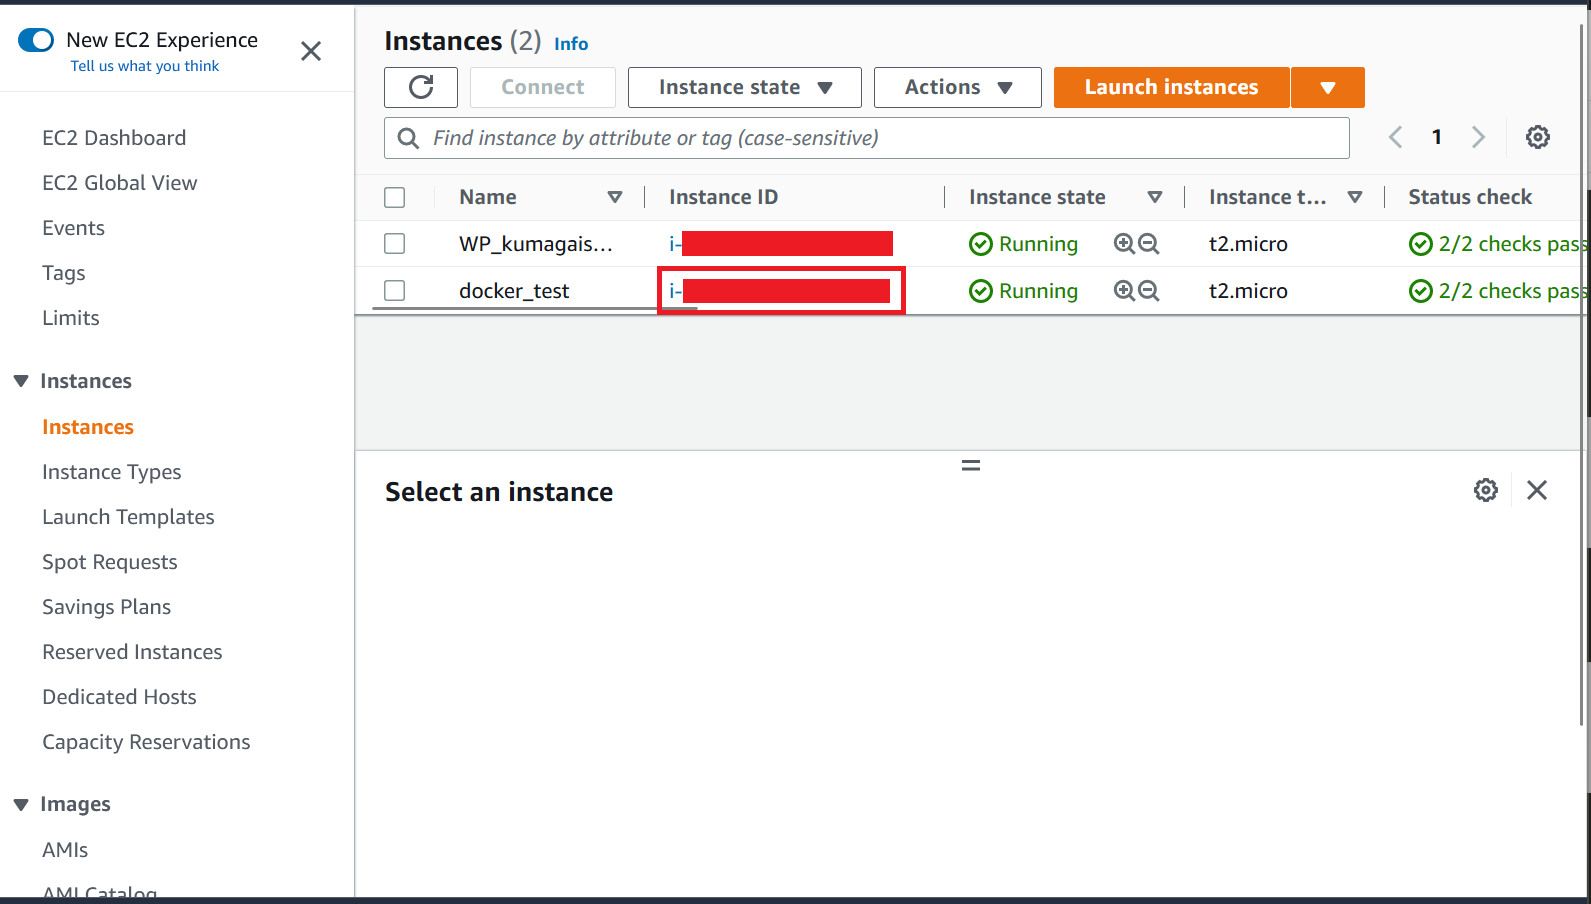
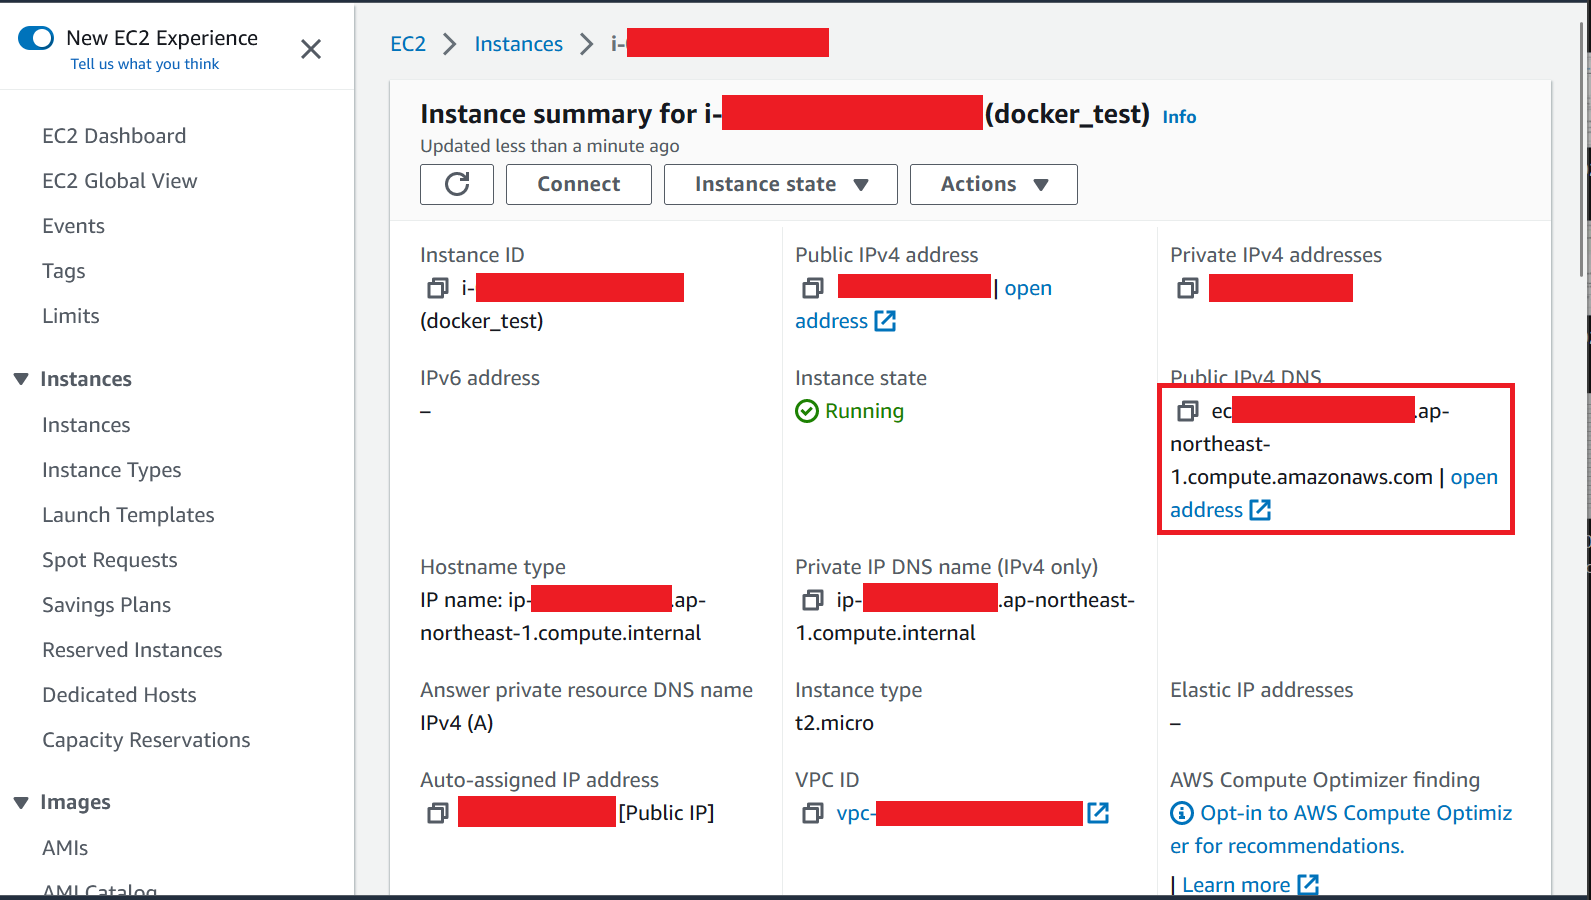
以下画面に遷移し,"docker_test"の"Instance ID"をクリックする.
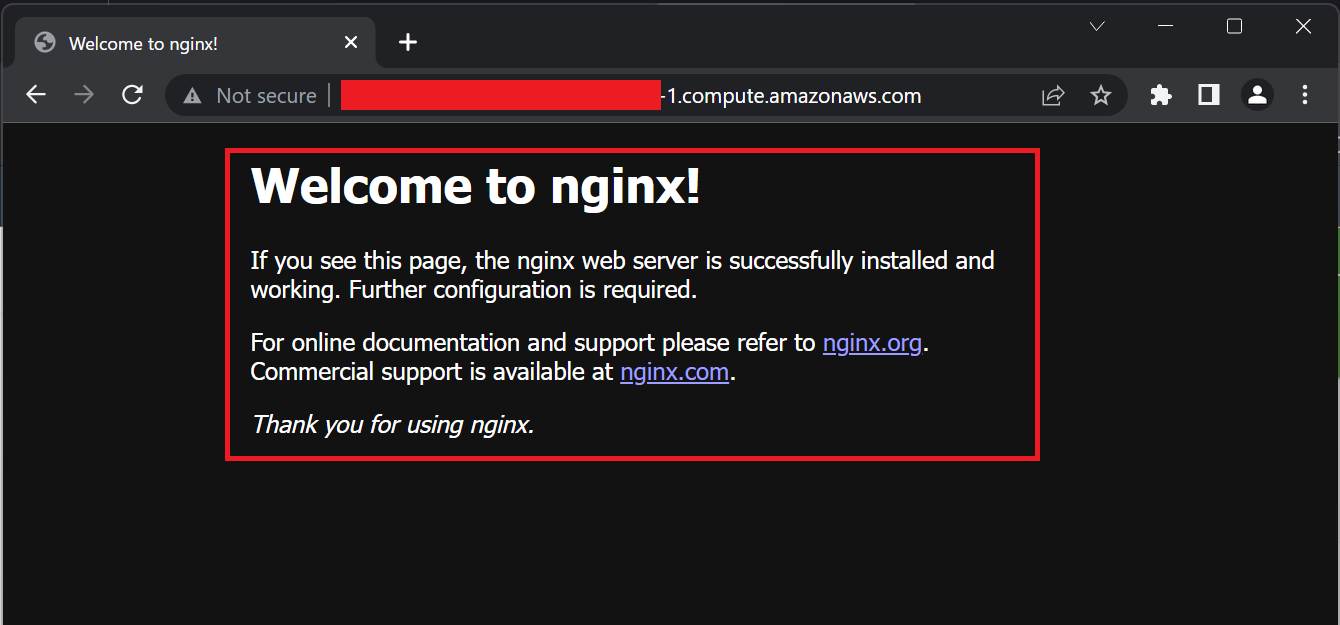
以下画面に遷移するので,"Public IPv4 DNS"のURLをコピーする.
ブラウザに貼り付けると,以下のようにnginxが起動する.
以下を実行すると,process statusが出力される.その後,"docker stop <CONTAINER ID>"(“docker stop <NAME>"すなわち"docker stop busy_wright"でも可能)を実行すると,nginxのコンテナはストップする.
再度起動させる際は,"docker start <NAME>"を実行する.
# docker ps
CONTAINER ID   IMAGE     COMMAND                  CREATED         STATUS         PORTS                               NAMES
xxxxxxxxxxxx   nginx     "/docker-entrypoint.…"   2 minutes ago   Up 2 minutes   0.0.0.0:80->80/tcp, :::80->80/tcp   busy_wright

# docker stop <CONTAINER ID>
以下のようにnginxはストップする.
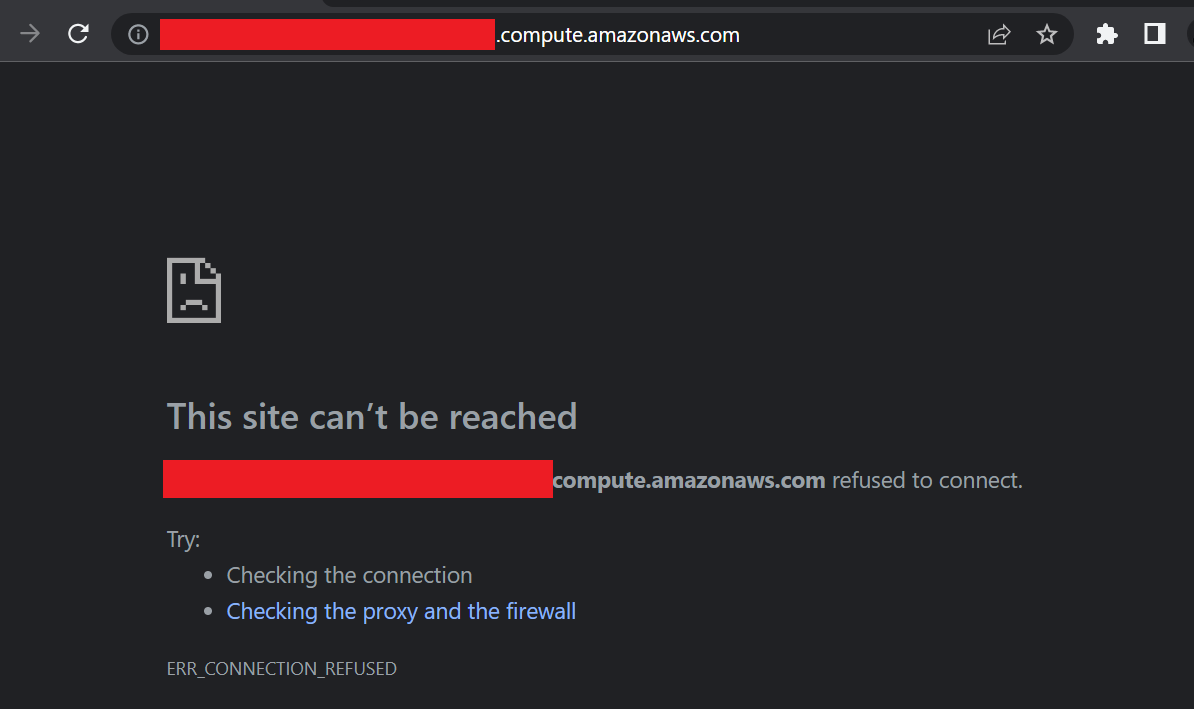
“dokcer ps"ではコンテナ一覧が出力されなくなったが,"docker ps -a"を実行すると,以下のようにすべてのコンテナ一覧が出力される.
# docker ps
CONTAINER ID   IMAGE     COMMAND   CREATED   STATUS    PORTS     NAMES

# docker ps -a
CONTAINER ID   IMAGE         COMMAND                  CREATED             STATUS                     PORTS     NAMES
xxxxxxxxxxxx   nginx         "/docker-entrypoint.…"   About an hour ago   Exited (0) 4 minutes ago             busy_wright
xxxxxxxxxxxx   ubuntu        "bash"                   2 hours ago         Exited (0) 2 hours ago               dazzling_antonelli
xxxxxxxxxxxx   hello-world   "/hello"                 3 hours ago         Exited (0) 3 hours ago               amazing_edison
Docker Clean Up
以下コマンドを実行すると,現在のコンテナやイメージの状況が出力される.
# docker info
Client:
 Context:    default
 Debug Mode: false

Server:
 Containers: 3
  Running: 0
  Paused: 0
  Stopped: 3
 Images: 4
 Server Version: 20.10.17
 Storage Driver: overlay2
  Backing Filesystem: xfs
  Supports d_type: true
  Native Overlay Diff: true
  userxattr: false
 Logging Driver: json-file
 Cgroup Driver: cgroupfs
 Cgroup Version: 1
 Plugins:
  Volume: local
  Network: bridge host ipvlan macvlan null overlay
  Log: awslogs fluentd gcplogs gelf journald json-file local logentries splunk syslog
 Swarm: inactive
 Runtimes: runc io.containerd.runc.v2 io.containerd.runtime.v1.linux
 Default Runtime: runc
 Init Binary: docker-init
 containerd version: xxx
 runc version: xxx
 init version: xxx
 Security Options:
  seccomp
   Profile: default
 Kernel Version: 5.10.162-141.675.amzn2.x86_64
 Operating System: Amazon Linux 2
 OSType: linux
 Architecture: x86_64
 CPUs: 1
 Total Memory: 964.8MiB
 Name: xxx
 ID: xxx
 Docker Root Dir: /var/lib/docker
 Debug Mode: false
 Registry: https://index.docker.io/v1/
 Labels:
 Experimental: false
 Insecure Registries:
  127.0.0.0/8
 Live Restore Enabled: false
以下コマンドにより,Dockerの"CONTAINER ID"が出力される.
# docker ps -a
CONTAINER ID   IMAGE         COMMAND                  CREATED             STATUS                      PORTS     NAMES
xxxxxxxxxxxx   nginx         "/docker-entrypoint.…"   About an hour ago   Exited (0) 15 minutes ago             busy_wright
xxxxxxxxxxxx   ubuntu        "bash"                   3 hours ago         Exited (0) 3 hours ago                dazzling_antonelli
xxxxxxxxxxxx   hello-world   "/hello"                 3 hours ago         Exited (0) 3 hours ago                amazing_edison
以下のように,"docker rm <CONTAINER ID 1> <CONTAINER ID 2> <CONTAINER ID 3>"を実行すると,対象のコンテナは削除される.
# docker rm <CONTAINER ID 1> <CONTAINER ID 2> <CONTAINER ID 3>以下コマンドを実行すると,イメージの一覧が出力される.
# docker images
REPOSITORY    TAG       IMAGE ID       CREATED         SIZE
mariadb       10.3      xxxxxxxxxxxx   37 hours ago    369MB
nginx         latest    xxxxxxxxxxxx   4 days ago      142MB
ubuntu        latest    xxxxxxxxxxxx   13 days ago     77.8MB
hello-world   latest    xxxxxxxxxxxx   16 months ago   13.3kB
以下のように,"docker rmi <IMAGE ID 1> <IMAGE ID 2> <IMAGE ID 3> <IMAGE ID 4>"を実行すると,対象のイメージは削除される.
# docker rmi <IMAGE ID 1> <IMAGE ID 2> <IMAGE ID 3> <IMAGE ID 4>以下コマンドを実行すると,全てのイメージが削除されたことがわかる.
# docker images
REPOSITORY   TAG       IMAGE ID   CREATED   SIZE
Docker Pause
dockerの再起動する際には,以下いずれかを実行する.
# docker restart <CONTAINER ID>
or
# docker restart <NAME>
dockerを一時停止する際には,以下いずれかを実行する.
# docker pause <CONTAINER ID>
or
# docker pause <NAME>
dockerを一時停止から戻す際には,以下いずれかを実行する.
# docker unpause <CONTAINER ID>
or
# docker unpause <NAME>
Docker Commit
“Docker commit"をすることでコンテナをシェアすることができる.このシェア方法を以下に説明する.
以下コマンドを実行し,ubuntuをpullする.
# docker pull ubuntu以下コマンドを実行し,ubuntuを起動させる.
# docker run -dit ubuntu以下コマンドを実行し,ubuntuの"CONTAINER ID"を把握する.
# docker ps -a
CONTAINER ID   IMAGE     COMMAND       CREATED         STATUS         PORTS     NAMES
37d4fcbf3c06   ubuntu    "/bin/bash"   2 minutes ago   Up 2 minutes             cranky_vaughan
以下コマンドを実行すると,起動しているubuntuコンテナの中に入る.
# docker exec -it 37d4fcbf3c06 bash以下コマンドを実行することで,ubuntuを更新させ,その後,コンテナの上にApache2をインストールする.
# apt-get update
# apt-get install apache2
以下コマンドを実行することで,ubuntuを更新させ,その後,コンテナの上にApache2をインストールする.
# apt-get update
# apt-get install apache2
以下コマンドを実行することで,apache2が起動する.
# service apache2 start
 * Starting Apache httpd web server apache2
AH00558: apache2:
Could not reliably determine the server's fully qualified domain name, using 172.17.0.3. Set the 'ServerName' directive globally to suppress this message
以下コマンドを実行することで,apache2が起動したことが確認できる.
# service apache2 status
 * apache2 is running
以下コマンドを実行することで,"docker_test"という名のディレクトリを作成し,ubuntuディレクトリから出る.
# mkdir docker_test

# ls
bin   dev          etc   lib    lib64   media  opt   root  sbin  sys  usr
boot  docker_test  home  lib32  libx32  mnt    proc  run   srv   tmp  var

# exit
以下コマンドを実行することで,"CONTAINER ID"を取得し,その後,当該IDを利用してdocker commitを実行すると,新たなイメージ(mydocker)を取得することができる.
# docker ps
CONTAINER ID   IMAGE     COMMAND       CREATED          STATUS          PORTS     NAMES
37d4fcbf3c06   ubuntu    "/bin/bash"   21 minutes ago   Up 21 minutes             cranky_vaughan

# docker commit 37d4fcbf3c06 mydocker
sha256:59184a0cdbe4e28ac398cdf2dc23ae5d08cd1dade28bca30d5bae00679fa6e8e
以下コマンドを実行すると,新たなイメージが表示される.
# docker images
REPOSITORY   TAG       IMAGE ID       CREATED         SIZE
mydocker     latest    59184a0cdbe4   3 minutes ago   227MB
nginx        latest    9eee96112def   4 days ago      142MB
ubuntu       latest    58db3edaf2be   13 days ago     77.8MB
以下を実行することで,新たなコンテナ(mydockercontainer)を起動させることができる.
# docker run -dit --name mydockercontainer mydocker
14465ceb1684f83c259eadf9f2dec7d561425e852c7e462e0c6028a9bd880d19
以下コマンドを実行することで,コンテナが作成されたことが確認できた.
# docker ps
CONTAINER ID   IMAGE      COMMAND       CREATED          STATUS          PORTS     NAMES
14465ceb1684   mydocker   "/bin/bash"   34 seconds ago   Up 33 seconds             mydockercontainer
37d4fcbf3c06   ubuntu     "/bin/bash"   45 minutes ago   Up 45 minutes             cranky_vaughan
上記で実行したことと同じように,以下コマンドを実行し,起動しているコンテナ(mydockercontainer)の中に入る.
# docker exec -it mydockercontainer bash以下コマンドを実行することで,コンテナ(mydockercontainer)の中のディレクトリの一覧を確認することができる.ubuntuディレクトリの中で作成した"docker_test"ディレクトリを確認することができる.
# ls
bin   dev          etc   lib    lib64   media  opt   root  sbin  sys  usr
boot  docker_test  home  lib32  libx32  mnt    proc  run   srv   tmp  var
以下コマンドを実行することで,コンテナ(mydockercontainer)の中のapache2が起動する.
# service apache2 start
 * Starting Apache httpd web server apache2
AH00558: apache2:
Could not reliably determine the server's fully qualified domain name, using 172.17.0.3. Set the 'ServerName' directive globally to suppress this message
以下コマンドを実行することで,apache2が起動したことが確認できる.
# service apache2 status
 * apache2 is running
MariaDB Containerの実行
以下コマンドを実行すると,mariadbのイメージが起動する.コマンドの詳細については以下に記載をする.
- -i: Keep STDIN open even if not attached (接続されていなくとも標準入力を開いたままにする)
- -d: Run container in background and print container ID (バックグラウンドでコンテナーを動かし,コンテナIDを表示する)
- -t: Allocate a pseudo-TTY (疑似端末を割り当てる; pseudo=疑似, tty=text-termial=標準入出力となっている端末デバイス)
- -p: Publish a container’s port(s) to the host (ホストにコンテナポートを発行する)
- “3306(ホストのポート):3306(コンテナのポート)": ホスト3306番ポートへの通信はすべてコンテナのポートへ転送している
- –name=sk-mariadb: コンテナの名前を"sk-mariadb"に設定する
- –env="MARIADB_ROOT_PASSWORD=docker1234″: root向けのパスワードを"pass1234″に設定する
- –env="MARIADB_DATABASE=kumadb": Mariadbの名前を"kumadb"に設定する
オプションについては,以下URLを参照する.
MariaDB | MariaDB Docker Environment Variables
# docker run -i -d -t -p 3306:3306 --name=sk-mariadb --env="MARIADB_ROOT_PASSWORD=docker1234" --env="MARIADB_DATABASE=kumadb" mariadbその後,以下コマンドを実行すると,"sk-mariadb"という名前のコンテナが作成されたことがわかる.
# docker ps
CONTAINER ID   IMAGE     COMMAND                  CREATED         STATUS         PORTS                                       NAMES
75281612c6bd   mariadb   "docker-entrypoint.s…"   4 seconds ago   Up 3 seconds   0.0.0.0:3306->3306/tcp, :::3306->3306/tcp   sk-mariadb
以下コマンドを実行すると,"sk-mariadb"コンテナの中に入ることができる.
# docker exec -it sk-mariadb bash以下コマンドを実行することで,MariaDBに接続することができる.passwordを求められるので,上記で作成した"docker1234″を入力する.
# mariadb -uroot -p
Enter password:
Welcome to the MariaDB monitor.  Commands end with ; or \g.
Your MariaDB connection id is 3
Server version: 10.10.3-MariaDB-1:10.10.3+maria~ubu2204 mariadb.org binary distribution

Copyright (c) 2000, 2018, Oracle, MariaDB Corporation Ab and others.

Type 'help;' or '\h' for help. Type '\c' to clear the current input statement.

MariaDB [(none)]>
以下コマンドを実行すると,kumadbと名付けたデータベースを確認できる.
MariaDB [(none)]> show databases;
+--------------------+
| Database           |
+--------------------+
| information_schema |
| kumadb             |
| mysql              |
| performance_schema |
| sys                |
+--------------------+
5 rows in set (0.000 sec)
“use kumadb;"を実行すると,データベースが変更され,"show tables;"を実行すると,テーブルがないことが確認できる."exit"を実行すると,データベースから抜け出し,MariaDBに戻る.
MariaDB [(none)]> use kumadb;
Database changed

MariaDB [kumadb]> show tables;
Empty set (0.000 sec)

MariaDB [kumadb]> exit
Bye
Volumesの利用
dockerにおいて,Volumeは以下URLで詳細を確認することができる.Volumeを利用すると,ホストマシン上のDockerストレージディレクトリ内に新たなディレクトリが作成され,Dockerは当該ディレクトリのコンテンツを管理する.
以下コマンドを実行すると,volume nameが出力される.
# docker volume ls
DRIVER    VOLUME NAME
local     4ee8e3a102e2b23fd4804898f7ac9c8177a7e08b29298df75487a7be2a7b470f
local     a41da385d9d18a35b72f2191f88b37ff8375977296dd3d82b7988dc8e66936a0
以下コマンドを実行すると,volumeを作成することができる.当該volume名は"mydockervolume"とした.
# docker volume create mydockervolume
mydockervolume
新たなvolumeを作成後,以下コマンドを実行すると,新たなvolumeが追加されていることが確認できる.
# docker volume ls
DRIVER    VOLUME NAME
local     4ee8e3a102e2b23fd4804898f7ac9c8177a7e08b29298df75487a7be2a7b470f
local     a41da385d9d18a35b72f2191f88b37ff8375977296dd3d82b7988dc8e66936a0
local     mydockervolume
以下コマンドを実行する.
# docker run -dit --mount source=mydockervolume,destination=/tmp nginx
Unable to find image 'nginx:latest' locally
latest: Pulling from library/nginx
bb263680fed1: Pull complete
258f176fd226: Pull complete
a0bc35e70773: Pull complete
077b9569ff86: Pull complete
3082a16f3b61: Pull complete
7e9b29976cce: Pull complete
Digest: sha256:cb88ec9163d5e3641b75e3489916ecae847c93f75f2401ad562da91b29e9cabe
Status: Downloaded newer image for nginx:latest
d5196aeccb71962f743c6ae7f4383e9d574f894998ace24536a4b94fe1524893
以下コマンドを実行すること,当該フォルダが空であることがわかる.
# ls /var/lib/docker/volumes/mydockervolume/_data/以下コマンドを実行し,コンテナの詳細を確認できる.
# docker ps
CONTAINER ID   IMAGE     COMMAND                  CREATED             STATUS             PORTS                                       NAMES
d5196aeccb71   nginx     "/docker-entrypoint.…"   2 minutes ago       Up 2 minutes       80/tcp                                      competent_agnesi
75281612c6bd   mariadb   "docker-entrypoint.s…"   About an hour ago   Up About an hour   0.0.0.0:3306->3306/tcp, :::3306->3306/tcp   sk-mariadb
以下コマンドを実行し,nginxのコンテナの中に入る.
# docker exec -it d5196aeccb71 bash以下コマンドを実行すると,コンテナのディレクトリ構造がわかる.
# ls
bin   dev                  docker-entrypoint.sh  home  lib64  mnt  proc  run   srv  tmp  var
boot  docker-entrypoint.d  etc                   lib   media  opt  root  sbin  sys  usr
以下コマンドを実行し,tmpディレクトリに移動し,中身を確認すると空であることがわかる.
/# cd /tmp
/tmp# ls
以下コマンドを実行し,tmpディレクトリに3つのファイルを作成する.その後,当該ディレクトリから出る.
/tmp# touch test1.txt test2.txt test3.txt

/tmp# ls
test1.txt  test2.txt  test3.txt

/tmp# exit
exit
以下コマンドを実行し,"_data"ディレクトリに移動し,中身を確認するとtmpディレクトリに3つのファイルを確認することができる.
# cd /var/lib/docker/volumes/mydockervolume/_data

# ls
test1.txt  test2.txt  test3.txt
以下コマンドを実行し,"_data"ディレクトリでtest4.txtを作成する.
[~_data]# echo "volumes function is testing" > test4.txt

[~_data]# cat test4.txt
volumes function is testing
以下コマンドを実行し,再度nginxのコンテナの中に入る.
[~_data]# docker exec -it d5196aeccb71 bash以下コマンドを実行し,tmpディレクトリに戻り,中身を確認すると,test4.txtが表示されている.test4.txtの内容も入力した通りになっている.
/# cd /tmp

/tmp# ls
test1.txt  test2.txt  test3.txt  test4.txt

# cat test4.txt
volumes function is testing
Bind Mountsの利用
dockerにおいて,Bind Mountsは以下URLで詳細を確認することができる.Bind Mountsを利用すると,ホストマシン上のファイルやディレクトリがコンテナにマウントされる.
以下コマンドを実行し,rootディレクトリ内に"bm_test"ディレクトリを作成する.
# pwd
/root

# mkdir bm_test

# ls
bm_test
以下コマンドを実行すると,mariadbのイメージが起動する.コマンドの詳細については以下に記載をする.
- -v: Bind mount a volume (ファイルやディレクトリをコンテナ内にマウントする)
# docker run -dit -v /root/bm_test:/tmp ubuntu

Unable to find image 'ubuntu:latest' locally
latest: Pulling from library/ubuntu
677076032cca: Already exists
Digest: sha256:9a0bdde4188b896a372804be2384015e90e3f84906b750c1a53539b585fbbe7f
Status: Downloaded newer image for ubuntu:latest
9d53bfb5785b07f0f9dd8e34783564ffb431151d5bfb57fe7e11099c457f2511
以下コマンドを実行すると,"CONTAINER ID"を取得できる.
# docker ps
CONTAINER ID   IMAGE     COMMAND                  CREATED          STATUS          PORTS                                       NAMES
9d53bfb5785b   ubuntu    "/bin/bash"              48 seconds ago   Up 47 seconds                                               infallible_mcnulty
d5196aeccb71   nginx     "/docker-entrypoint.…"   5 hours ago      Up 5 hours      80/tcp                                      competent_agnesi
75281612c6bd   mariadb   "docker-entrypoint.s…"   6 hours ago      Up 6 hours      0.0.0.0:3306->3306/tcp, :::3306->3306/tcp   sk-mariadb
以下コマンドを実行し,ubuntuコンテナ内に入る.
# docker exec -it 9d53bfb5785b bash以下コマンドを実行すると,ubuntuコンテナのディレクトリ構成を確認でき,tmpディレクトリを確認できる.
# ls
bin  boot  dev  etc  home  lib  lib32  lib64  libx32  media  mnt  opt  proc  root  run  sbin  srv  sys  tmp  usr  var
以下コマンドを実行し,tmpディレクトリ内に"test1.txt"と"test2.txt"を作成し,当該ディレクトリから抜けた.
# cd tmp

/tmp# ls
/tmp# touch test1.txt
/tmp# touch test2.txt

/tmp# ls
test1.txt  test2.txt

# exit
exit
以下コマンドを実行すると,bm_testディレクトリ内に,tmpディレクトリで作成した"test1.txt"と"test2.txt"を確認することができた.
# ls bm_test/
test1.txt  test2.txt
Docker network
dockerにおいて,networkについては以下URLで詳細を確認することができる.
■基本
以下コマンドを実行することで,daemonが認識しているネットワークの一覧を表示する.
# docker network ls
NETWORK ID     NAME      DRIVER    SCOPE
546e0d277ed8   bridge    bridge    local
ebd687a736bf   host      host      local
78d28bc22293   none      null      local
以下コマンドを実行することで,bridgeのネットワークについての詳細を確認することができる.
# docker network inspect bridge以下コマンドを実行することで,新たなnetwork IDを入手することができた.
# docker network create test_network --subnet=172.19.0.0/16
a8cbe5fa6dee358da46e26cc54ae6483ff0b393aee90dbf1bef57f5628629149
以下コマンドを実行すると,作成した"test_network"を確認できる.
# docker network ls
NETWORK ID     NAME           DRIVER    SCOPE
546e0d277ed8   bridge         bridge    local
ebd687a736bf   host           host      local
78d28bc22293   none           null      local
a8cbe5fa6dee   test_network   bridge    local
以下コマンドを実行すると,新たなコンテナを作成し,コンテナ内にいることがわかる.
# docker run --name webserver999 --net test_network --ip 172.19.0.5 -h web.bharath.com -p 82:88 -ti ubuntu /bin/bash
root@web:/#
この際に"ctrl"キーを押したまま"p"と"q"をクリックすると,以下のようにコンテナから出て,rootに戻る.
root@web:/# [root@ip-xxx ~]#rootの状態で以下コードを実行すると,"websever999″の中に戻る."hostname"と入力すると,上記で記載した"web.bharath.com"が出力される.
root@web:/# [root@ip-xxx ~]# docker attach webserver999

root@web:/# hostname
web.bharath.com
再度"ctrl"キーを押したまま"p"と"q"をクリックすると,"read escape sequence"が出力され,"websever999″から出て,"root"に戻る.
root@web:/# read escape sequence
#
以下コマンドを実行し,コンテナの一覧を出力する.ubuntuのコンテナが2種類あり,1つの名前は"webserver999″,もう1つが"infallible_mcnulty"となる.
# docker ps
CONTAINER ID   IMAGE     COMMAND                  CREATED         STATUS         PORTS                                       NAMES
1128c6a4dd59   ubuntu    "/bin/bash"              9 minutes ago   Up 9 minutes   0.0.0.0:82->88/tcp, :::82->88/tcp           webserver999
9d53bfb5785b   ubuntu    "/bin/bash"              3 hours ago     Up 3 hours                                                 infallible_mcnulty
d5196aeccb71   nginx     "/docker-entrypoint.…"   8 hours ago     Up 8 hours     80/tcp                                      competent_agnesi
75281612c6bd   mariadb   "docker-entrypoint.s…"   9 hours ago     Up 9 hours     0.0.0.0:3306->3306/tcp, :::3306->3306/tcp   sk-mariadb
上記で実行したように,以下コマンドを再度実行すると,rootからもう1つのubuntuコンテナである"infallible_mcnulty"の中に入る.
# docker attach infallible_mcnulty
root@9d53bfb5785b:/#
以下のように,"hostname"を入力すると,以下のように出力される.
root@9d53bfb5785b:/# hostname
9d53bfb5785b
■コンテナネットワークの変更
以下コマンドを実行すると,webserver999の接続が切れる.
# docker network disconnect test_network webserver999以下コマンドを実行すると,表示されてあったIP addressなどが表示されないことが確認できる.
# docker inspect webserver999以下コマンドを実行すると,再接続することができる.
# docker network connect bridge webserver999以下コマンドを実行すると,表示されてなかったIP addressなどが再度表示されることが確認できる.
# docker inspect webserver999DockerfileとDockerHubの利用
Dockerは,Dockerfileに書かれた指示を読み込むことで自動的にイメージをビルドすることができる.Dockerfileはtext documentであり,イメージを組み立てるコマンドラインと呼ばれるコマンドすべてが記載されている.
Dockerfileで利用されるコマンドは以下があげられ,使い方を右に記す.
- FROM: FROM ubuntu
- COPY: COPY app.jar /server/deploy
- ENV: ENV JAVA_HOME=/opt/java
- RUN: RUN yum install apache2
- CMD: CMD python3 -version
- EXPOSE: EXPOSE 8080
なお,Dockerfileの書き方のベストプラクティスは以下URLが参考となる.
docker docs | Best practices for writing Dockerfiles
以下コマンドにより,Dockerfileの作成を開始できる.
# vi Dockerfile作成後,以下コマンドを実行すると,Dockerfileの内容を確認できる.
# cat Dockerfile
From ubuntu
RUN yum install -y httpd
ADD index.html /var/www/html
CMD apachectl -D FOREGROUD
EXPOSE 80
MAINTAINER sk
ENV myenv myval
以下コマンドを実行し,index.htmlを編集する.
# vi index.html作成後,以下コマンドを実行し,index.htmlの内容を確認する.
# cat index.html
Dockerfiles are so useful!!
以下コマンドを実行したが,途中で"/bin/sh: 1: yum: not found"が表示されたため,ストップしてしまった.
# docker build -t webserver_df .
Sending build context to Docker daemon  19.97kB
Step 1/7 : From ubuntu
 ---> 58db3edaf2be
Step 2/7 : RUN yum install -y httpd
 ---> Running in e53e972c0a22
/bin/sh: 1: yum: not found
The command '/bin/sh -c yum install -y httpd' returned a non-zero code: 127
以下のように修正し,再度実行する.
# cat Dockerfile
From ubuntu
RUN apt-get update && apt-get install -y apache2
ADD index.html /var/www/html
CMD apachectl -D FOREGROUND
EXPOSE 80
MAINTAINER sk
ENV myenv myval
途中以下のような警告文が発生したが,無事ビルドすることができた.
debconf: delaying package configuration, since apt-utils is not installed

Successfully built 41058ae542f4
Successfully tagged webserver_df:latest
上記の警告文をなくすためにも,最終的には,以下のようなDockerfileがよさそう.
From ubuntu
RUN apt-get update && apt-get install -y \ apache2 \ apt-utils
ADD index.html /var/www/html
CMD apachectl -D FOREGROUND
EXPOSE 80
MAINTAINER sk
ENV myenv myval
なお,以下コマンドを実行すると,"webserver_df"イメージを作成することができた.
# docker images
REPOSITORY     TAG       IMAGE ID       CREATED          SIZE
webserver_df   latest    41058ae542f4   10 minutes ago   227MB
nginx          latest    3f8a00f137a0   17 hours ago     142MB
mariadb        latest    5986006dc2c5   2 days ago       400MB
ubuntu         latest    58db3edaf2be   2 weeks ago      77.8MB
centos         latest    5d0da3dc9764   17 months ago    231MB
以下URLにアクセスし,"Repositories"をクリックし,"Create Repository"をクリックし,repositoryを作成する.
タグ付けをしエラーが出たので,ターミナルに戻り,以下コマンドを実行する.
# docker tag 230210_repository/webserver_df shiro9ma/webserver_df以下コマンドを実行し,docker loginを行う.
# docker login以下コマンドを実行し,イメージのレポジトリ名を取得する.
# docker images
REPOSITORY                       TAG       IMAGE ID       CREATED          SIZE
230210_repository/webserver_df   latest    62d50267fc67   41 minutes ago   227MB
webserver_df                     latest    62d50267fc67   41 minutes ago   227MB
shiro9ma/webserver_df            latest    62d50267fc67   41 minutes ago   227MB
<none>                           <none>    41058ae542f4   2 hours ago      227MB
nginx                            latest    3f8a00f137a0   19 hours ago     142MB
mariadb                          latest    5986006dc2c5   2 days ago       400MB
ubuntu                           latest    58db3edaf2be   2 weeks ago      77.8MB
centos                           latest    5d0da3dc9764   17 months ago    231MB
以下コマンドを実行し,DockerイメージをDocker Hubにプッシュすることができた.
# docker push shiro9ma/webserver_df
Using default tag: latest
The push refers to repository [docker.io/shiro9ma/webserver_df]
a39c42426029: Pushed
9b241791ff7a: Pushed
c5ff2d88f679: Pushed
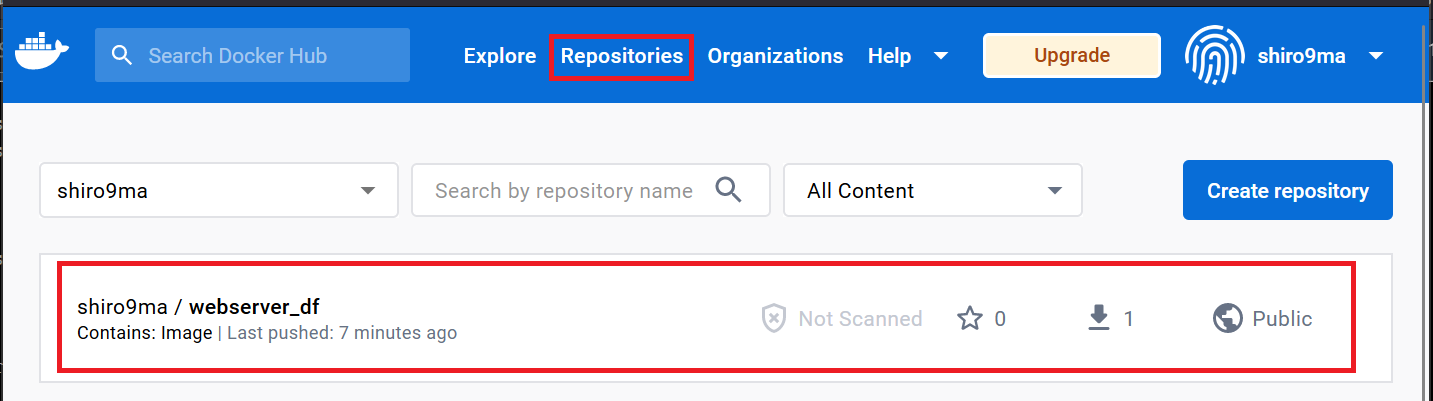
latest: digest: sha256:ab9ac2a89e6410c225274c476c1fed496cdadf500c1a0654f0b786efe6ff349d size: 948Docker Hubにアクセスし,"Repositories"をクリックすると,以下のように"shiro9ma/webserver_df"を確認することができた.
参照
Udemy | Docker for Python Django Developers
以上